Hey there, future chef! Ever wonder how grown-ups make chicken and burgers taste so good and not yucky or unsafe? Sometimes, they use a secret tool: a meat thermometer! And a Taylor one is like a trusty sidekick. Let’s learn all about how to use a Taylor meat thermometer so you can help make food that’s super yummy AND safe to eat. No more guessing games!
Why This Gadget is Your Kitchen Buddy
So, why even use a meat thermometer? It’s like having a superpower for cooking!
- Keeps Tummy Aches Away: It helps make sure meat is cooked enough to zap any tiny bad guys (germs) that could make you feel sick.
- Makes Food Taste Awesome: Nobody likes dry, tough chicken, right? This tool helps you cook meat just perfectly – not too much, not too little.
- You Look Like a Pro!: Knowing your food is perfectly cooked is pretty cool.
Ready to try it? Learning how to use a Taylor meat thermometer is going to be fun! Let’s go!
What Kind of Taylor Thermometer Do You Have?
First, let’s look at your Taylor thermometer. It might be one of these:
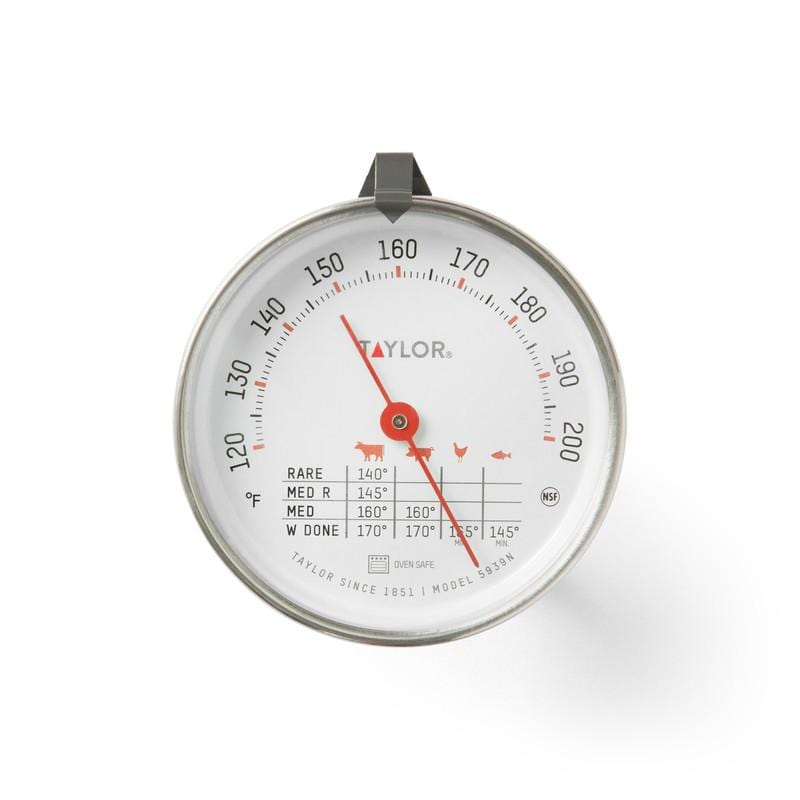
- The Pointy One with a Dial (Analog): This kind has a little arrow that points to numbers, like a clock. It’s simple and tough!
- The One with Numbers that Light Up (Digital): This kind shows you the temperature with numbers on a little screen. Super quick and easy to read! Some you poke in and take out right away (“instant-read”). Others have a wire and can stay in the food while it cooks in the oven (“leave-in”). Understanding your specific model is the first step in mastering how to use a Taylor meat thermometer.
Cool Parts to Know:
- The Pokey Part (Probe): This is the pointy metal stick that goes into the food.
- The Screen or Dial: This shows you how hot the food is.
- Buttons (on Digital ones): You might have an On/Off button, or one to switch between different temperature numbers (like °F or °C).
No matter which one you have, they mostly work the same way when you’re figuring out how to use a Taylor meat thermometer.
Let’s Cook! Using Your Taylor Thermometer Step-by-Step
This is the fun part! This section is all about the practical side of how to use a Taylor meat thermometer.
Get Ready:
- Wash it!: Make sure the pointy part is clean. A little soap and warm water will do. Rinse and dry it!
- Know the Magic Number: Different foods need to get to different “magic numbers” (temperatures) to be safe and yummy. You can ask a grown-up to help you look up the right temperature for what you’re cooking (like, chicken needs to be 165°F). This knowledge is key for how to use a Taylor meat thermometer effectively.
Where to Poke it (This is Important!):
- Find the Fattest Part: Stick the pointy probe into the thickest part of the meat.
- No Bones or Gristle!: Try not to hit a bone or the really fatty, chewy bits. You want it right in the middle of the meaty part.
- For a Whole Chicken: Ask a grown-up to help you find the thickest part of the leg (they call it the thigh).
- For Flat Food (like Burgers or Chicken Pieces): You might need to poke the thermometer in from the side so the tip is right in the middle. Proper placement is a big part of learning how to use a Taylor meat thermometer.
Read the Number!
- Quick Poke Thermometers (Instant-Read): Poke it in like you learned. Wait a few seconds for the numbers to stop changing or the arrow to stop moving. Then take it out. These don’t stay in the oven!
- Stay-In Thermometers (Leave-In): If yours has a wire, poke the pointy part into the meat before it goes in the oven. The part with the screen stays outside so you can watch the temperature go up. Some even beep when it’s ready!
- Wait for it to Stop: Don’t pull it out too fast! Wait until the number on the screen stays the same or the arrow on the dial stops moving.

Is Your Thermometer Telling the Truth? (Checking if it Works Right!)
Sometimes, these tools need a little check-up to make sure they’re showing the right temperature. This is an important step in knowing how to use a Taylor meat thermometer like a real pro.
Why Check?
If it’s wrong, your food might not cook right.
The Super Cold Ice Test:
- Get a glass and fill it ALL the way with ice.
- Add a little bit of cold water. Stir it.
- Put the pointy part of your thermometer in the icy water (don’t touch the glass sides or bottom).
- Wait about 30 seconds. It should say 32°F (or 0°C). That’s the freezing point!
The Bubbly Hot Water Test (Ask a Grown-Up to Help!):
- Have a grown-up boil some water in a pot.
- Carefully put the pointy part in the bubbly water (don’t touch the pot).
- It should say 212°F (or 100°C). That’s the boiling point!
What if it’s Wrong?
- Dial ones: Some Taylor thermometers with dials have a tiny nut you can turn with a small wrench to fix it while it’s in the ice water. Ask a grown-up for help if you try this!
- Digital ones: Most digital ones can’t be changed. If it’s way off, tell a grown-up. It might need a new battery or it might be time for a new one.
Uh Oh! What if it’s Acting Funny? (Fixing Little Problems)
- Seeing “LLL” or “HHH” on the Screen? This means it’s too cold (‘LLL’) or too hot (‘HHH’) for what the thermometer can read. Or, the pointy part might be broken.
- The Number Seems Crazy! Did you poke it in the right spot? Is the pointy part clean?
- Won’t Turn On? It probably needs a new battery! Ask a grown-up to help change it.
Keep it Happy:
Don’t put the whole thermometer in water unless it says it’s okay (waterproof). Just wash the pointy metal part.
Super Tips for Awesome Food!
Want to be a real cooking star? These super tips will make you even better at how to use a Taylor meat thermometer.
- For Big Meats: If you’re cooking something big like a whole chicken or a big piece of beef, check the temperature in a couple of different spots.
- Secret: It Keeps Cooking! Meat actually keeps cooking for a few minutes after you take it out of the oven or off the grill. So, you can take it out when it’s just a little bit before the magic number.
- Let Your Meat Take a Nap! After cooking, cover the meat with some foil and let it sit for 5 or 10 minutes. This makes it extra juicy and tasty! It’s called “resting.”
Taking Care of Your Awesome Tool
- Clean it Up: After you use it, wash the pointy part with warm, soapy water. Wipe the rest of it with a cloth if it got dirty.
- Put it Away Safe: Many Taylor thermometers come with a little cover for the pointy part. Use it! It keeps it safe. Don’t just toss it in a drawer where it can get broken.
You Can Do It!
See? Learning how to use a Taylor meat thermometer is pretty easy! It just takes a little practice. Now you can help make sure all your family’s meals are cooked just right – super safe and super delicious.
Go ahead, give it a try (with a grown-up’s help, of course!). Happy cooking, chef!
FAQ for How to Use a Taylor Meat Thermometer
Q1: What if I accidentally poke a bone with the thermometer?
A1: Oops! If you hit a bone, the number might be wrong. Just pull it out a little and try poking it in a nearby meaty spot instead. Bones get hotter or colder differently than meat!
Q2: Can I use my meat thermometer for other stuff, like cake or milk?
A2: Some Taylor thermometers are just for meat. But some digital ones might be okay for other things like warm milk or even checking if your cake is done (if the pointy part is long enough!). It’s best to ask a grown-up or check the box it came in.
Q3: How do I find out the “magic number” (the right temperature) for what I’m cooking?
A3: Great question! You can ask a grown-up to help you look it up on the internet – just search for “safe cooking temperature for chicken” (or whatever you’re making). Some Taylor thermometers even have temperatures for different meats printed right on them!
Q4: Does poking the meat with the thermometer make all the yummy juices come out?
A4: Not really! It makes a tiny hole, but it’s so small that it won’t let out much juice. It’s much better to poke it and be safe than to guess and eat undercooked meat. And remember, letting the meat “rest” after cooking helps keep the juices in too!
Q5: What if I check the temperature and the food is still too cold in the middle?
A5: No problem! That just means it needs to cook a little longer. Put it back in the oven or on the grill and check it again in a few minutes.
Q6: How often do I need to do the ice water test to check if my thermometer is working right?
A6: You don’t have to do it every single time you cook. But it’s a good idea to check it:
- If you drop your thermometer.
- If the readings seem weird or different than usual.
- Maybe once every few months, just to be sure!
Q7: Can I leave my digital thermometer in the oven if it doesn’t have a long wire?
A7: Nope! Only the kind with a long metal wire (called a “leave-in” thermometer) can stay in the oven. The pointy part goes in the meat, and the part with the screen stays outside. If yours is an “instant-read” (no wire, and you just poke it in for a few seconds), it can’t stay in the hot oven or it might melt or break.
Q8: What if the numbers on my digital thermometer screen look funny or are hard to read?
A8: That usually means the battery is getting old and needs to be changed. Ask a grown-up to help you put in a new one!
Q9: Where’s the best place to keep my thermometer when I’m not using it?
A9: Keep it in a safe place, like a kitchen drawer where it won’t get bumped around too much. If it came with a little cover for the pointy end, use that to protect it!
Hope that helps, super chef! Keep asking questions and have fun cooking!