Calibrating a meat thermometer keeps readings accurate and protects food safety every time.
I’ve calibrated dozens of thermometers in home and professional kitchens, so I’ll show you exactly how to calibrate a meat thermometer step by step. This guide explains simple tests, clear steps for probe, dial, and instant-read types, when to recalibrate, and tips I learned the hard way to keep your readings spot on. Read on to make sure your thermometer tells the truth every time you cook.

Why calibrate your meat thermometer
Calibrating verifies that the thermometer reads true. A wrong reading can undercook meat or waste food by overcooking. Many thermometers drift over time or after rough handling. Regular calibration is a fast way to protect health and improve results.
Common reasons to calibrate:
- New thermometer out of box may not be exact.
- Drops, knocks, or high heat can shift the sensor.
- Routine checks catch slow drift before it matters.
Knowing how to calibrate a meat thermometer gives you confidence when cooking steaks, poultry, pork, or large roasts. It’s a simple safety habit that saves stress and keeps food safe.
Tools you need before you start
Gather a few simple things before you test or calibrate:
- Thermometer you want to calibrate
- A large glass or container for ice water
- Clean ice and cold water
- A small pot of boiling water (if doing the boiling method)
- Spoon or tongs to position the probe
- Timer or watch (for waiting)
These items let you run the two most common checks: the ice water method and the boiling point method. Both are easy, safe, and require no special equipment.

Two reliable calibration methods
There are two trusted ways to check and adjust most kitchen thermometers: the ice water method and the boiling point method.
Ice water method
- Fill a glass with crushed ice. Add cold water until full.
- Stir and let sit 30 seconds.
- Insert the probe into the ice slurry without touching glass sides.
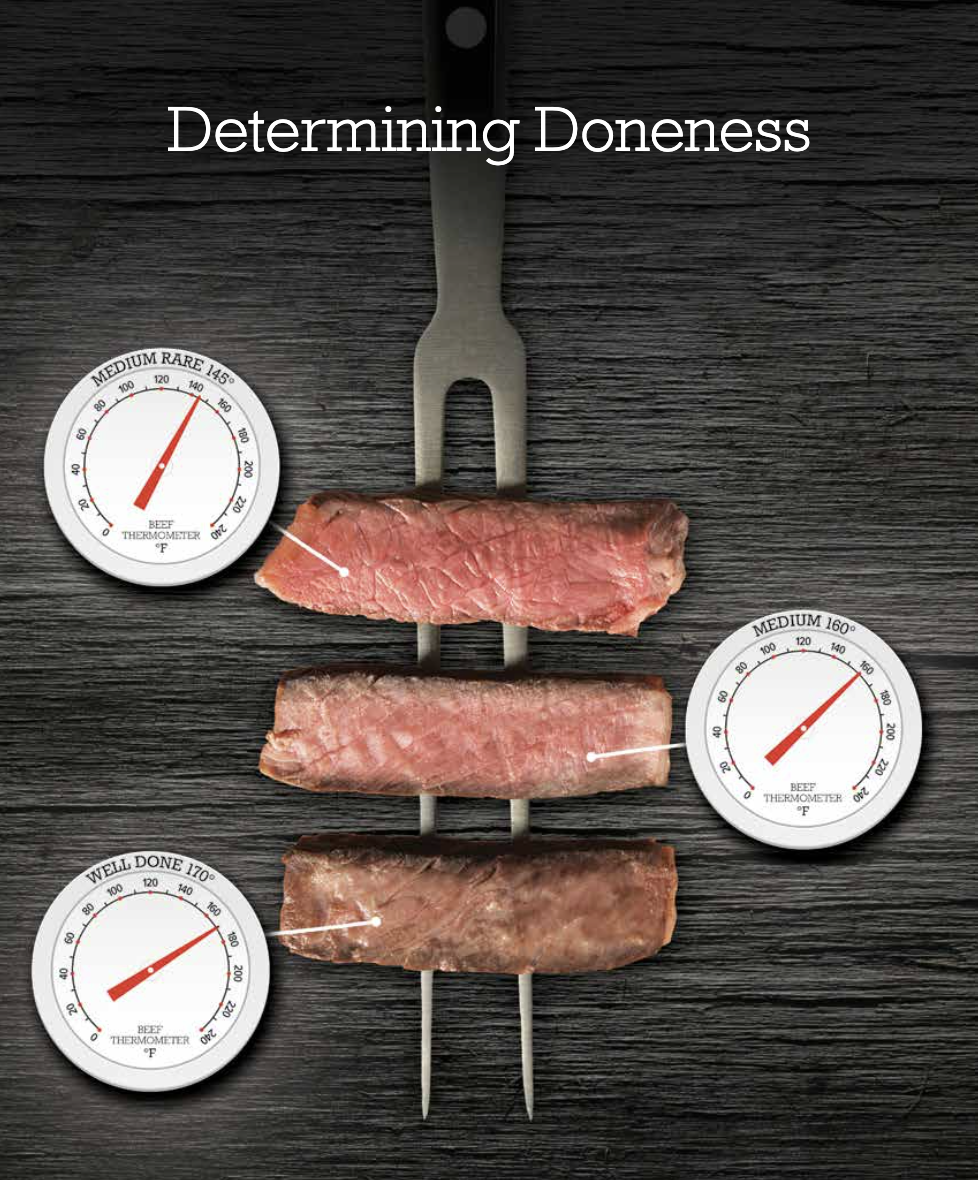
- A correctly calibrated thermometer reads 32°F (0°C).
Boiling point method
- Bring a pot of water to a steady boil.
- Insert the probe into the boiling water, avoiding contact with pot sides or bottom.
- A properly calibrated thermometer reads 212°F (100°C) at sea level.
- Adjust for altitude: boiling point drops about 1°F for every 500 feet above sea level.
Which method to use
- Use ice water for most kitchen thermometers. It’s safer and less affected by altitude.
- Use boiling water as a second check or if your thermometer’s manual specifies it.
PAA-style questions:
What if my thermometer won’t reach 32°F in ice water?
If it doesn’t read 32°F, note the offset. You can adjust a calibration dial if available, or remember the offset when reading foods.
Can I use salted ice water to speed cooling?
Salt lowers freezing point and will change the target reading. Don’t use salt unless you adjust the expected temperature.
Is one method better for digital vs. dial thermometers?
Ice water is best for both. Boiling can stress some cheap sensors and varies with altitude, so use it carefully.

Step-by-step: how to calibrate a meat thermometer (digital probe)
Here’s a clear process for digital probe thermometers and many instant-read models.
- Prepare ice slurry
- Fill a glass with crushed ice. Add cold water until full. Stir and wait 30 seconds.
- Test the thermometer
- Insert the probe at least 2 inches into the ice water. Avoid touching glass sides.
- Wait for the reading to stabilize (usually 15–30 seconds).
- Read and record the result
- If the display reads 32°F (0°C), it’s accurate.
- If not, note the difference (for example, 34°F = +2°F).
- Adjust if possible
- Some models have a calibration or offset button. Follow the manual to set the known temperature.
- If the model has no adjustment, mentally subtract or add the offset when cooking.
- Verify with the boiling method as a second check if needed
- Remember to adjust for altitude.
This is how to calibrate a meat thermometer so you can trust it during critical cooks like turkey day or smoking meats.

Calibrating dial and analog thermometers
Dial and analog thermometers often have a small calibration nut or screw on the back.
- Use the ice water method first
- Place the probe in ice water and wait for it to settle.
- Adjust the dial
- Use pliers or a small wrench to turn the nut until the dial points to 32°F (0°C).
- Recheck
- Repeat the ice water test to confirm accuracy.
If the dial sticks or reacts slowly, consider replacing it. Many dial thermometers read fairly well but can become unreliable after several years.

Calibrating instant-read thermometers (quick tips)
Instant-read thermometers are convenient but need careful testing.
- Probe depth matters. Insert the probe at least 1–2 inches into the food or water when testing.
- Let the reading settle for the time recommended by the manufacturer (often 3–10 seconds).
- If a model shows a consistent offset, track that offset or recalibrate if the device allows it.
These tools are fast. Checking them before big cooks prevents surprises.
When to recalibrate and routine maintenance
Regular checks keep your thermometer accurate. Recalibrate:
- After any hard drop or obvious shock.
- If readings seem inconsistent or change suddenly.
- Before major events, like holiday meals.
- Every 3–6 months for frequent cooks.
Maintenance tips:
- Clean probe after each use with warm soapy water.
- Avoid immersing digital displays in water.
- Store in a protective case to prevent bends or knocks.
A small habit of checking saves time and avoids food waste.

Common mistakes and troubleshooting
Avoid these mistakes when you learn how to calibrate a meat thermometer:
- Not using enough probe depth. Shallow readings are inaccurate.
- Touching pot or glass sides. That skews temperature.
- Ignoring altitude in boiling tests. Elevation changes boiling point.
- Assuming new equals accurate. Always test new thermometers.
Troubleshooting tips:
- If thermometer reads wildly different each test, battery or sensor may be failing.
- If adjustments don’t hold, replacement is cheaper than risky meat.
- For small offsets, track the offset and correct readings until you replace the unit.
Personal tips and real-life examples
I once roasted a 20-pound turkey with a thermometer that read high by 5°F. I followed the recipe but undercooked the bird. After that, I started calibrating every year and before big meals. Since then, I’ve never had to guess doneness.
Lessons learned:
- Always test new thermometers. Even trusted brands can be off.
- Keep a small notebook or phone note with each thermometer’s offset.
- Use the ice water method before a long cook. It takes two minutes and avoids disaster.
These small steps make a big difference in quality and safety.
Frequently Asked Questions of How to calibrate a meat thermometer
How often should I calibrate my meat thermometer?
Check calibration every 3–6 months, after a drop, or before major cooking events. Frequent cooks should test more often.
Can all thermometers be calibrated?
Many digital and dial thermometers can be checked and adjusted. Some cheap instant-read models lack adjustment but can be used with a noted offset.
Does altitude affect calibration?
Altitude affects boiling-point checks. Use the ice water method for altitude-independent calibration, or adjust boiling-point expectations for elevation.
What temperature should my thermometer read in ice water?
A properly calibrated thermometer reads 32°F (0°C) in a well-stirred ice water slurry.
My thermometer is off by a couple degrees. Is that okay?
Small offsets (1–2°F) are usually fine for many cooks. For precise low-temp smoking or candy work, aim for exact calibration or replace the unit.
How do I clean the thermometer without damaging it?
Clean the probe with warm soapy water and dry. Avoid submerging displays or battery compartments.
[Note: No CodeImg after FAQ as requested]
Final thoughts and next steps
Calibrating your thermometer is simple, fast, and essential for safe, tasty cooking. Use the ice water method first, keep a record of any offset, and recalibrate after shocks or before big meals. Make calibration a quick habit and you’ll save flavor, time, and worry.
Try this now: test your thermometer with ice water today. If it’s off, adjust or note the offset, and enjoy more confident cooking. Leave a comment below with your calibration story or questions — I’d love to help.


