Replace worn seals or cartridges and tighten fittings to stop most faucet leaks quickly.
I’ve fixed hundreds of household leaks. This guide on how to fix a leaking kitchen faucet will walk you from simple checks to full part swaps. You will learn clear steps, tools to gather, and when to call a pro. Read on for practical, tested advice that saves water and money.
:max_bytes(150000):strip_icc()/repairing-a-single-handle-disk-faucet-1824878-hero-b3daee9af5174d8f9b9cb4a2582e7140.jpg)
Diagnose the leak and find the cause
Start by watching the leak and where it comes from. A steady drip from the spout is different from a leak at the base or under the sink. Knowing the exact leak point makes how to fix a leaking kitchen faucet faster and cheaper.
Common leak locations
- At the spout
- Around the handle or base
- Under the sink at water lines or fittings
- During use only, or all the time
Quick checks
- Turn off the faucet and watch. Does the drip stop?
- Check supply lines and connections under the sink.
- Note the faucet type. How you fix a leaking kitchen faucet depends on whether it’s compression, cartridge, ball, or ceramic disc.
I recommend labeling parts with tape before you take them apart. That helps when you put things back. My early mistakes were rushing and losing small parts. Learn from that.

Tools and parts you’ll need
Gather tools before you start. Having the right parts makes how to fix a leaking kitchen faucet quick and smooth.
Basic tools
- Adjustable wrench
- Slip-joint pliers
- Screwdrivers (flat and Phillips)
- Needle-nose pliers
- Allen keys (if needed)
- Plumber’s grease
- Replacement O-rings, seals, cartridges, or valve seats
Helpful extras
- Bucket and towel
- Flashlight
- Vinegar and old toothbrush (for mineral deposits)
- Thread seal tape
Buying the correct replacement part is key. Bring the old part to the store or take clear photos. That avoids wrong purchases and repeat trips.
Step-by-step: how to fix a leaking kitchen faucet
Before you begin, shut off the water supply under the sink. Open the faucet to drain remaining water. Keep parts organized in a bowl.
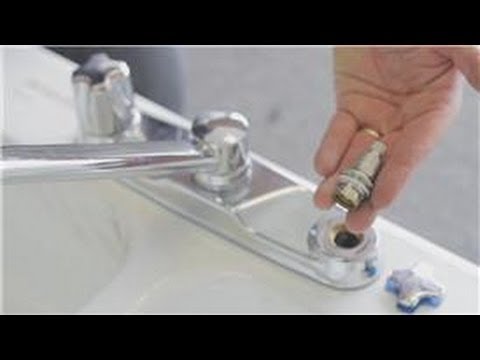
Compression faucet (old style)
- Turn off both hot and cold water.
- Remove handle and packing nut.
- Pull out the stem and inspect rubber seat and washer.
- Replace worn washer and O-ring with exact-size parts.
- Reassemble and test for leaks.
Compression faucets often leak from worn washers. I replaced a washer in 10 minutes and stopped a constant drip.
Cartridge faucet
1. Turn off water and remove handle.
2. Lift out the cartridge or unscrew retaining clips.
3. Inspect O-rings and cartridge for wear.
4. Replace cartridge or swap O-rings.
5. Grease O-rings lightly and reassemble.
Cartridge leaks are common. Replacing the cartridge usually fixes leaks at the spout and around handles.
Ball faucet (single-handle)
- Turn off water and remove handle and cap.
- Remove ball assembly and check springs and seats.
- Replace the seat and spring kit if damaged.
- Clean any mineral build-up in the housing.
- Reassemble and adjust the cam and ball for smooth handle action.
Ball faucets have small parts that wear. Keep a parts kit handy when learning how to fix a leaking kitchen faucet of this type.
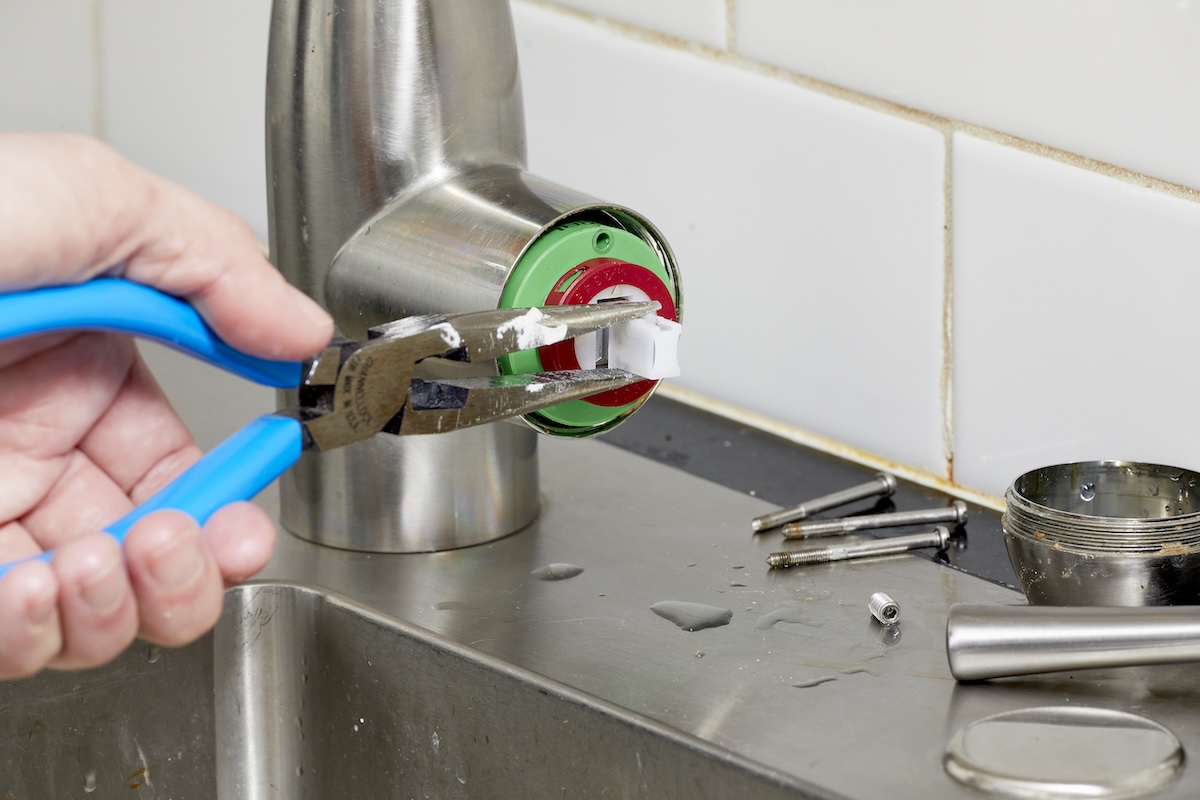
Ceramic disc faucet
- Turn off water and remove handle.
- Remove the cylinder assembly.
- Inspect seals at the bottom of the disc for wear.
- Replace seals or the entire cylinder if needed.
- Reassemble and test carefully.
Ceramic discs are durable but not immune. Replacing seals usually fixes many leaks.
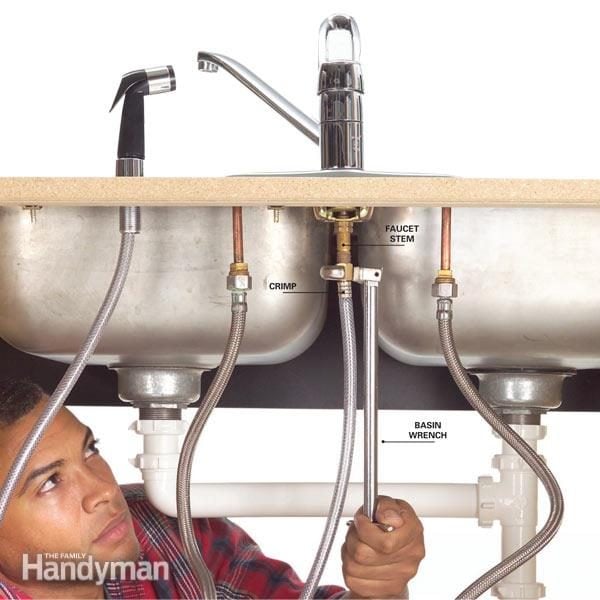
Fixing leaks at the base or under the sink
- Tighten mounting nuts under the sink for base leaks.
- Inspect supply lines for cracks and replace if needed.
- For leaks at fittings, turn off water, remove fitting, wrap threads with tape, and reconnect.
If tightening fittings stops the drip, you’ve completed how to fix a leaking kitchen faucet for that issue. If not, move to part replacement.
Tips, common mistakes, and prevention
Small habits cut leaks and repairs.
- Replace O-rings and seals at the first sign of wear to avoid bigger fixes.
- Clean aerators to fix low flow before assuming a leak.
- Avoid overtightening fittings; that can crack parts.
Common mistakes
- Not shutting off water fully and making a mess.
- Forcing parts that should slide out gently.
- Buying the wrong replacement part.
Preventive care
- Clean with vinegar to remove mineral build-up every few months.
- Run both hot and cold water weekly to keep parts moving.
- Replace supply lines every 5–7 years as a preventive step.
Personal note: I learned to keep a small parts kit. It saved time on many jobs. Treat your faucet like a small engine. Little care extends life.
When to call a professional
Call a pro when:
- You find corroded pipes under the sink.
- The leak is at the supply line connection and won’t stop.
- You cannot identify the source after checks.
Major plumbing issues can mean hidden damage. If repairs require cutting pipes or soldering, hire a licensed plumber. A pro can also check for water damage and mold.

People also ask (PAA-style questions)
Why is my faucet leaking only when it’s off?
A worn valve seat, washer, or O-ring often causes leaks when off. Replacing those parts usually fixes the leak.
Can mineral build-up cause a leak?
Yes. Mineral deposits can prevent seals from closing. Cleaning or replacing affected parts often stops the leak.
Is replacing a cartridge hard?
It is straightforward with the right parts and basic tools. Take photos during disassembly to make reassembly easier.
Frequently Asked Questions of how to fix a leaking kitchen faucet
What is the easiest way to stop a leaking kitchen faucet?
Turn off the water and replace the worn washer or O-ring. This simple step fixes many common leaks quickly.
How much does it cost to fix a leaking kitchen faucet?
DIY parts often cost $5 to $30. A professional repair can range from $75 to $250, depending on labor and parts.
How long does it take to fix a leaking kitchen faucet?
Simple repairs can take 15 to 45 minutes. Full cartridge or valve replacements might take 1 to 2 hours.
Can I fix a leaking kitchen faucet without shutting off water?
No. Always shut off the water supply before disassembly to avoid flooding and damage.
Will replacing the aerator stop a leak?
Replacing the aerator fixes flow problems and some minor drips, but it won’t fix internal leaks from seals or cartridges.
Conclusion
You can fix most leaks by finding the source, using the right tools, and replacing worn seals or cartridges. Start with simple checks, gather parts, and follow the steps for your faucet type. Take your time and keep parts organized. If the leak is complex or you find hidden damage, call a professional. Try one small repair today and see how much water and money you save—then share your results or questions below.


