Install the strainer in minutes: tighten flange, gasket, and locknut for a leak-free sink.
I’ve installed dozens of kitchen sink strainers and written plumbing guides for homeowners. In this article I’ll walk you step by step through how to install strainer in kitchen sink, explain tools and parts, share common mistakes, and help you finish the job cleanly and confidently. You’ll get clear instructions, practical tips from real projects, and troubleshooting advice so your new strainer seals tight and lasts.
Tools and materials you’ll need
Start by gathering the right tools and parts. A good prep saves time and prevents leaks when you learn how to install strainer in kitchen sink.
- Tools
- Adjustable wrench or slip-joint pliers
- Pipe wrench (optional for tight locknuts)
- Putty knife or scraper
- Flathead screwdriver
- Plumber’s putty or silicone sealant
- Bucket and rags
- Utility knife
- Parts
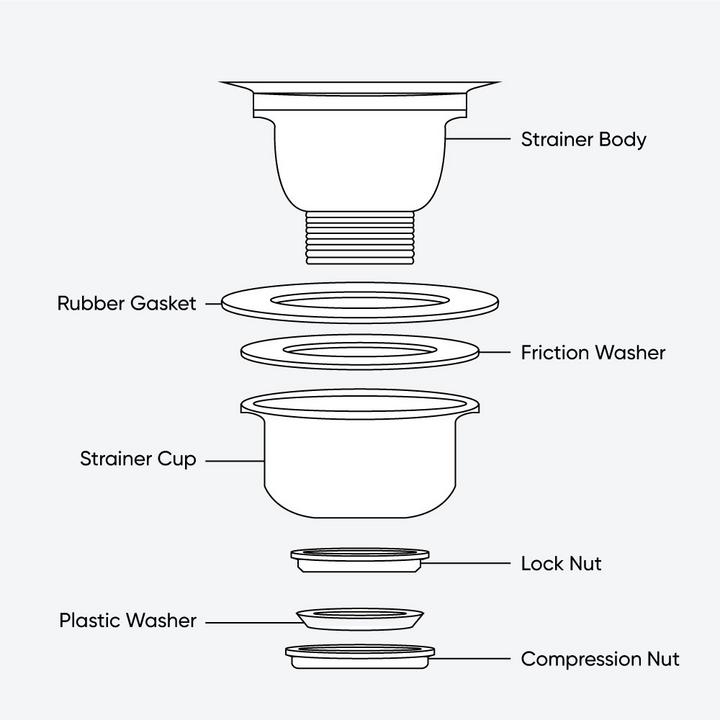
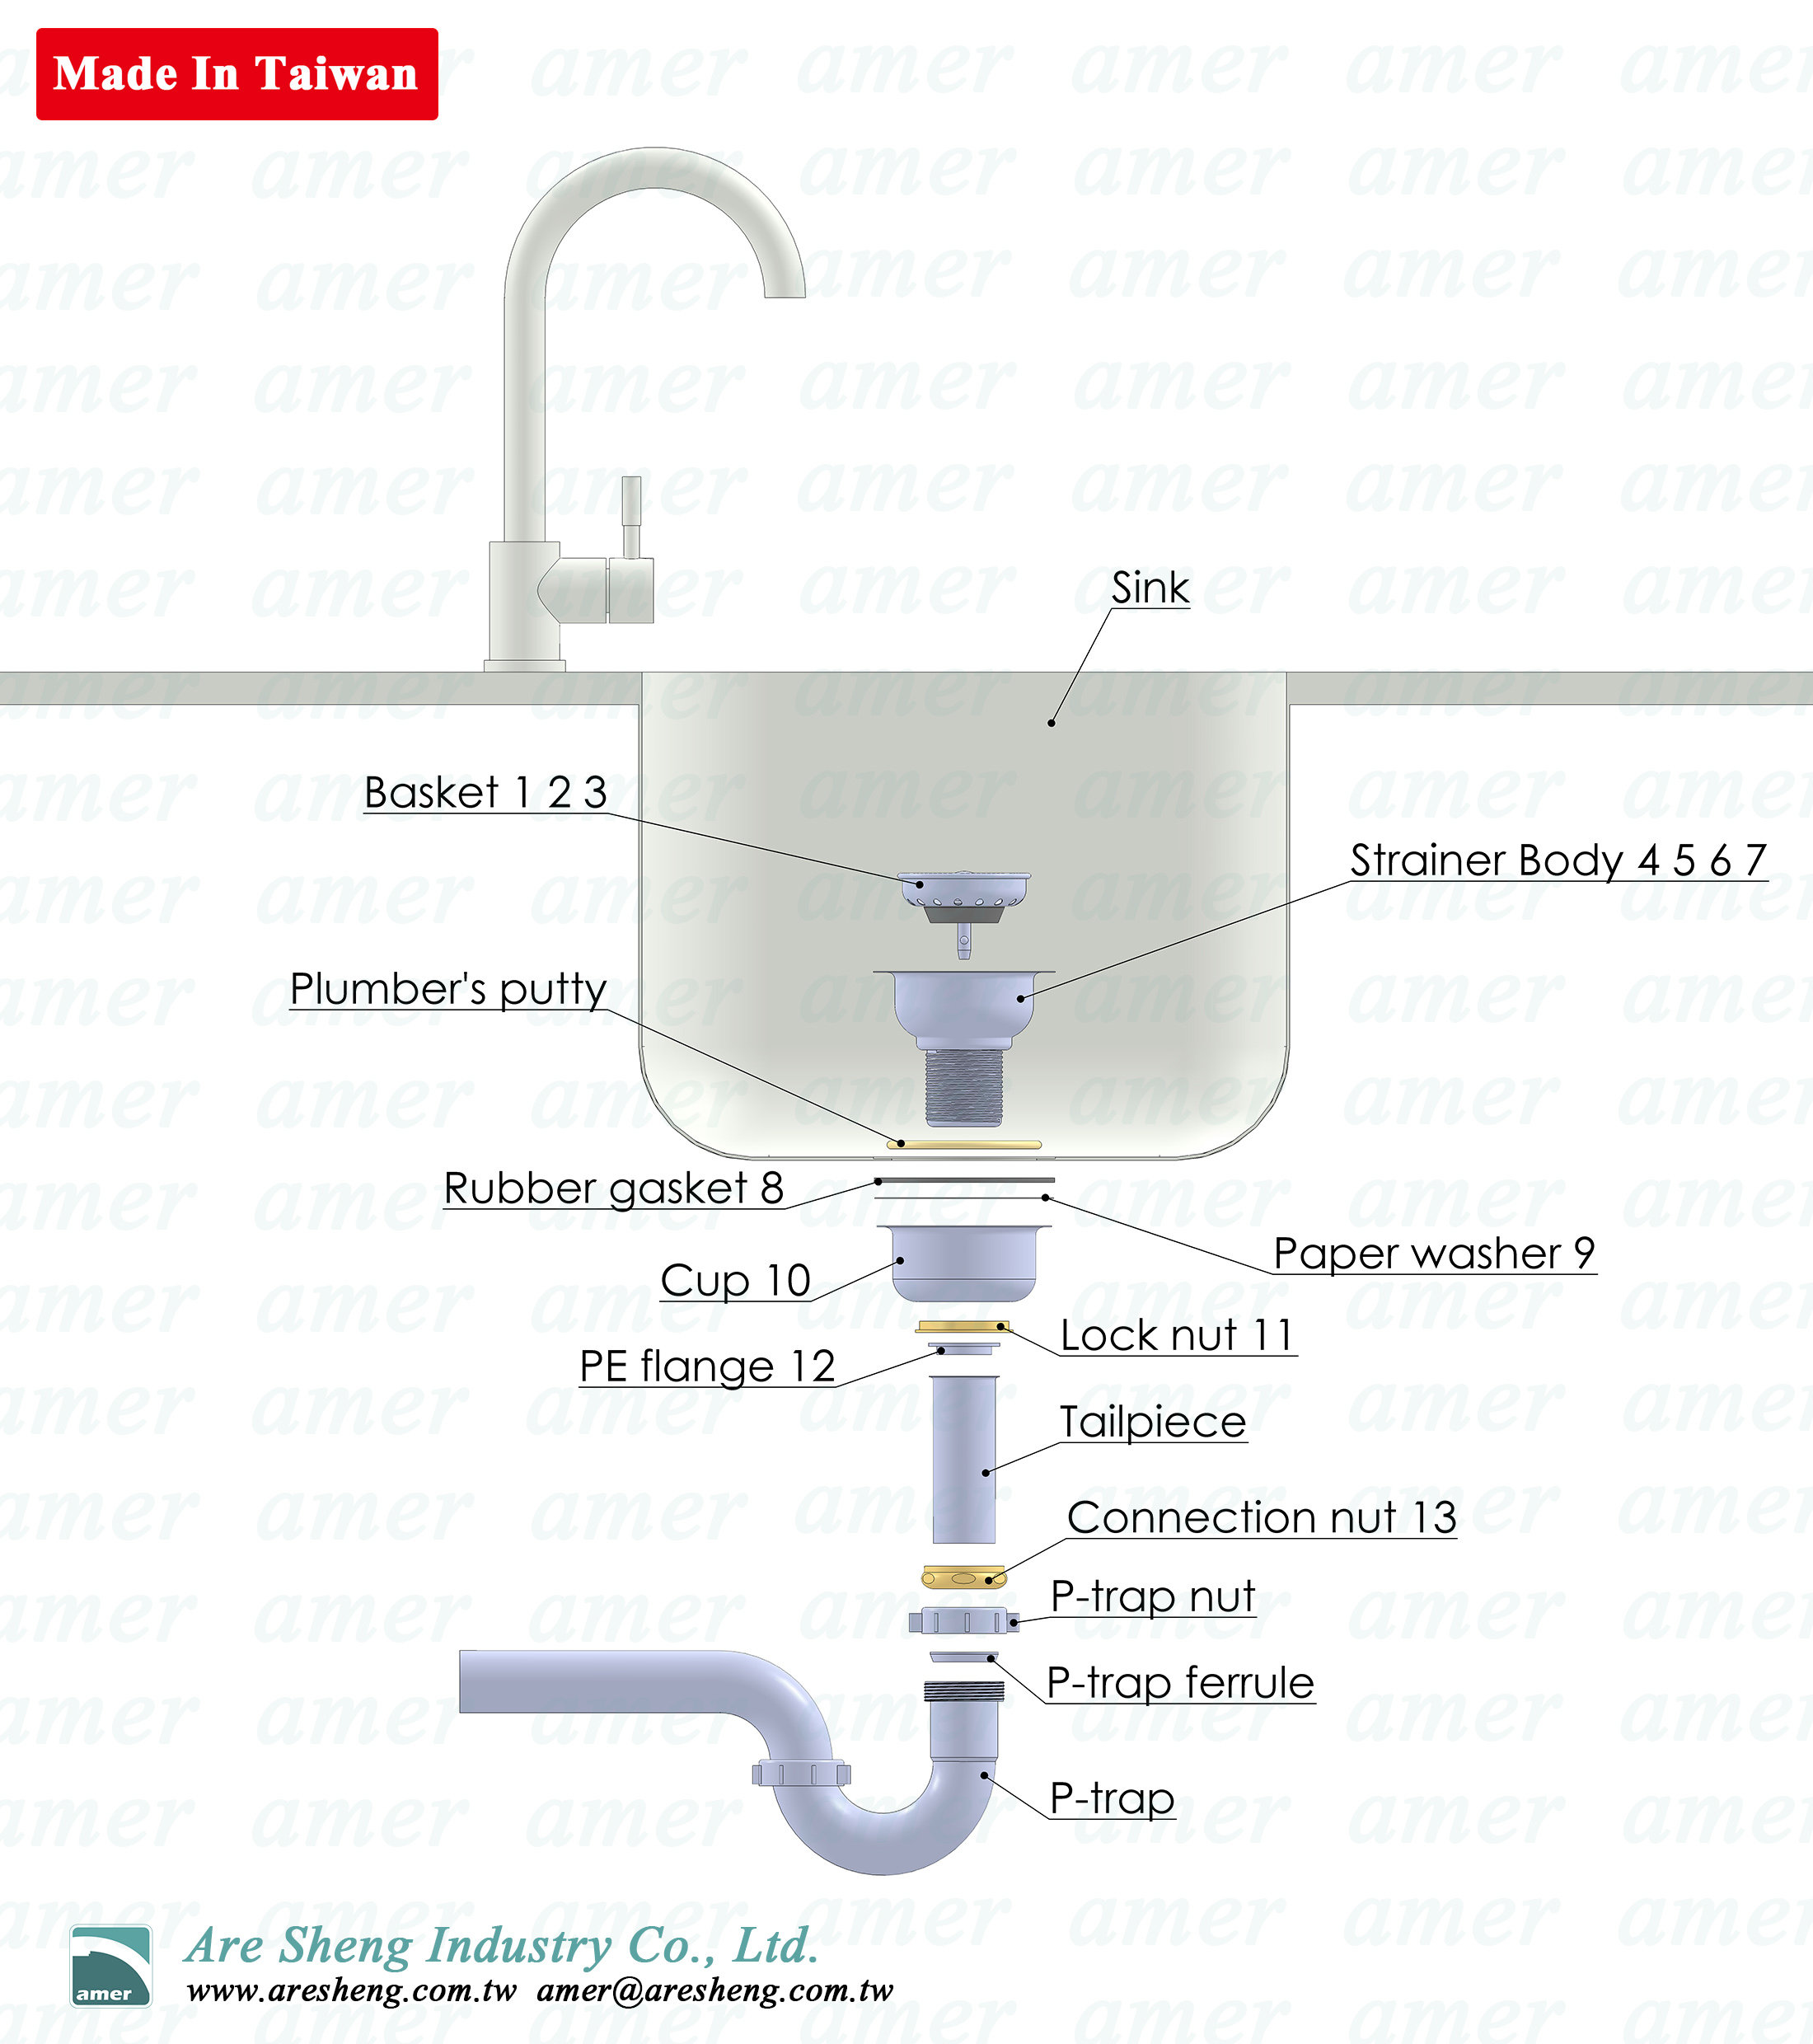
- Sink strainer assembly (flange, basket, rubber gasket, metal washer, locknut)
- Tailpiece and slip nut (if not included)
- New plumber’s putty or bead of silicone
I always lay everything out on a towel under the sink. That keeps small parts from falling down the cabinet and helps me stay organized.

Step-by-step: how to install strainer in kitchen sink
Follow these clear steps to install the strainer properly. Read all steps first so you know the flow.
- Clean the sink hole
- Remove old putty or sealant with a putty knife or scraper.
- Wipe the area with a rag until dry and free of debris.
- Apply plumber’s putty or silicone
- Roll a rope of plumber’s putty about 1/4 inch thick and place it around the underside of the strainer flange.
- If you prefer silicone, apply a continuous bead instead. Silicone needs curing time.
- Insert flange and press
- Lower the strainer flange into the sink hole.
- Press down firmly to seat the putty and create an even seal.
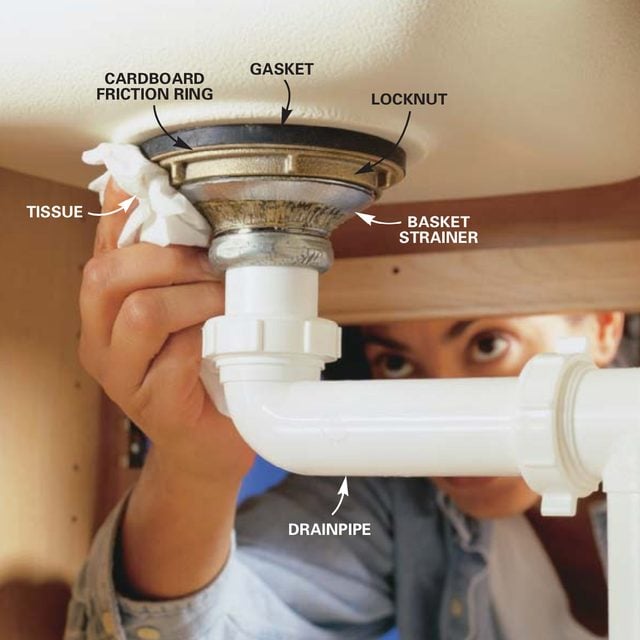
- Secure from below
- Slide the rubber gasket and metal washer onto the threaded body from below the sink.
- Hand-thread the locknut onto the threaded body until snug.
- Tighten the locknut with a wrench while holding the flange steady above. Tighten evenly to avoid tilting the flange.
- Remove excess putty
- From above the sink, remove excess plumber’s putty by pulling or wiping. For silicone, clean the edges after cure.
- Attach tailpiece and test
- Connect the tailpiece to the strainer body with its slip nut and washer.
- Run water and check for leaks. Tighten nuts slightly if you find drips.
I like to tighten the locknut in small turns while checking the flange above. This keeps the flange level and prevents cracks or misalignment.

Common mistakes and how to avoid them
Knowing mistakes ahead saves time and money when you learn how to install strainer in kitchen sink.
- Overtightening the locknut
- Overtightening can warp the flange or crack brittle sinks. Tighten snugly and check for level.
- Skipping the gasket or putty
- Missing the gasket or seal leads to leaks and water damage under the sink.
- Ignoring old parts
- Reusing worn gaskets or rusted locknuts can cause poor seals. Replace aged parts.
- Not testing before finishing
- Always run water and inspect below the sink before cleaning up and storing tools.
From experience, a small leak often traces back to uneven tightening or old sealant. If you take your time on the first install step, the rest flows smoothly.

Troubleshooting leaks and alignment
If you encounter leaks after learning how to install strainer in kitchen sink, try these checks and fixes.
- Check tightness
- Slightly tighten the locknut with a wrench while someone runs water. Do not overtighten.
- Inspect gaskets and washers
- Remove the assembly if leaks persist. Replace the rubber gasket or add fresh plumber’s putty.
- Look for misalignment
- If the flange sits crooked, loosen and realign the strainer before re-securing the locknut.
- Replace corroded parts
- Old metal washers or locknuts can corrode and fail to seal. Replace with new hardware.
If a leak is steady and you can’t stop it, removing the strainer and reseating it with fresh putty fixes most problems. I’ve rebuilt a few installs this way and all were watertight afterward.
Maintenance and care after installation
A well-installed strainer lasts longer with simple upkeep. Here’s how to care for it after you learn how to install strainer in kitchen sink.
- Clean the basket
- Remove debris and rinse the strainer basket weekly to prevent clogs.
- Check seals yearly
- Inspect under-sink for dampness or soft putty. Replace putty or tighten fittings if needed.
- Avoid harsh chemicals
- Strong drain cleaners can damage seals. Use enzyme cleaners or a plumber’s snake for clogs.
- Replace worn parts
- If the flange gets scratched or the basket stops sealing, replace the strainer assembly.
I include a quick check during routine kitchen cleaning. It takes a minute and prevents surprises later.

Types of strainers and compatibility
Choose a strainer that fits your sink and your plumbing. Knowing types helps when you plan how to install strainer in kitchen sink.
- Standard basket strainer
- A common choice with a removable basket to catch debris.
- Pop-up or push-button strainer
- Offers a built-in stopper for water retention.
- Flat top or decorative flange
- Matches modern sink styles and may require different seal methods.
- Material choices
- Stainless steel resists corrosion. Brass or plastic parts vary in durability.
Check your sink hole size and tailpiece threading before buying. I once bought a flange that looked right but had a different thread, which cost time and a return trip.

Cost, time, and when to call a pro
Most DIY installs are quick and budget-friendly. Here’s what to expect when you install strainer in kitchen sink.
- Cost
- Basic strainer assemblies range from economical to mid-priced. Expect affordable prices for standard parts.
- Time
- Most installs take 30 to 60 minutes for a single sink.
- When to call a pro
- Call a plumber if the sink is cracked, the drain pipe is corroded, or if you’re uncomfortable working under the sink.
I’ve installed many strainers in under an hour. But I recommend a pro for complex sinks or when multiple fittings need replacement.

Personal tips and lessons learned
These are practical tips I’ve developed from doing real installs on a variety of sinks. They help streamline how to install strainer in kitchen sink.
- Use plumber’s putty on metal sinks and silicone on composite sinks for better adhesion.
- Hand-tighten first, then use a wrench—small incremental turns avoid cross-threading.
- Keep a towel and bucket under the work area to catch drips and small parts.
- Label parts or take a quick photo before disassembly if you need to remove an old strainer.
One time I reused a brittle gasket and had to redo the job. Since then I always keep extra gaskets and putty on hand.
Frequently Asked Questions of how to install strainer in kitchen sink
Can I install a strainer without plumber’s putty?
Yes. You can use silicone sealant as an alternative. Silicone needs curing time and can be harder to remove later.
How tight should the locknut be?
Tighten until snug and the flange sits level. Do small additional turns as needed; avoid overtightening.
Can I replace a strainer without removing the P-trap?
Often yes. You may not need to remove the P-trap unless you must replace the tailpiece or clean deep clogs.
How long does plumber’s putty last?
Properly installed putty can last many years, but check annually for soft spots or leaks and replace if needed.
What if the sink flange is loose after installation?
Loosen and reseat the flange with fresh putty or silicone. Then tighten the locknut evenly while checking alignment.
Conclusion
You now have a clear, step-by-step path for how to install strainer in kitchen sink. Gather the right tools, follow the sealing and tightening steps, and test for leaks before finishing. If you take your time and use fresh gaskets or putty, the install is fast and reliable. Try the steps on your sink today, and leave a comment if you run into a problem or want advice on a specific sink type.


