Build custom kitchen cabinets with free plans, basic tools, and step-by-step guidance.
I’ve built cabinets for my own kitchen and helped friends follow free plans many times. This guide shows how to build kitchen cabinets free plans from start to finish. I’ll explain how to pick usable free plans, measure correctly, choose materials, cut parts, assemble boxes, fit doors, and install hardware. Read on if you want clear, practical steps, smart tips from experience, and ways to save money while getting a durable, beautiful result.

Why use free plans and how they save time and money
Free plans let you build custom cabinets without paying a designer. You get drawings, parts lists, and cut lists. Using free plans keeps costs low. They also teach shop skills. I used free plans that matched my kitchen layout. The plans saved me hundreds of dollars. They gave clear dimensions and a cut list I could trust.
Materials and tools you’ll need to follow free plans
Choosing good materials and tools makes the build smooth. Below is a concise list.
- Materials commonly used in free plans: 3/4" plywood for boxes, 1/4" plywood for backs, hardwood for face frames or MDF doors, edge banding.
- Fasteners: 1 1/4" pocket screws, 1 1/4" and 3/4" wood screws, glue.
- Hardware: concealed hinges, drawer slides, soft-close options, handles.
- Tools: circular saw or table saw, miter saw, drill/driver, pocket-hole jig, router (or trim router), sander, clamps, tape measure, speed square.
- Safety gear: eye protection, ear protection, dust mask.
I learned to invest in a good pocket-hole jig early. It cut assembly time and made joints stronger. If you only have basic tools, choose plans that use butt joints and screws.
How to find and evaluate free plans
Not all free plans are equal. Use these steps to pick the best free plans for your project.
- Look for full cut lists and exploded views. Plans that list parts save mistakes.
- Check for standard cabinet depths and heights. Standard base depth is 24" and height is 34.5" (without countertop).
- Verify material thickness in the plan. Many free plans assume 3/4" plywood.
- Read user comments or build logs when available. Builders often share pitfalls.
- Prefer plans with simple door styles if it’s your first build.
I compared three free plans before I built my first set. One had a missing cut list. I tossed it. The right plan made the job much faster.
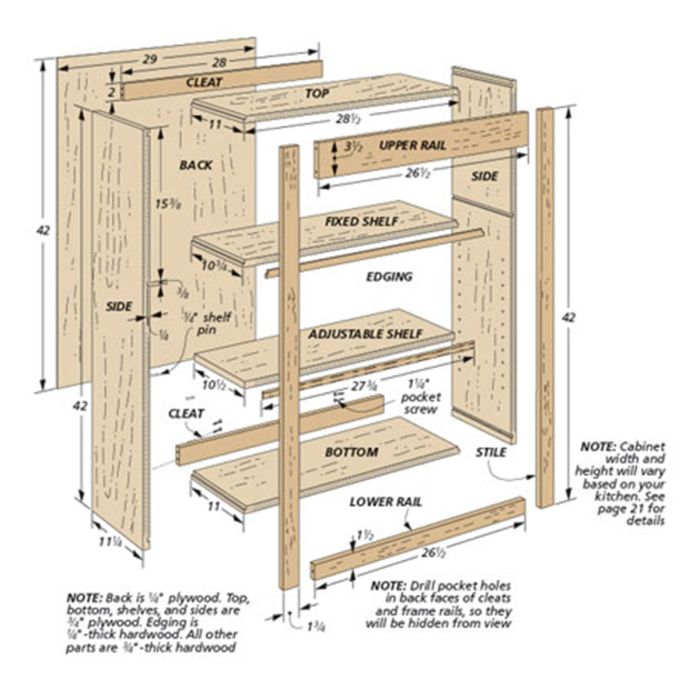
:max_bytes(150000):strip_icc()/CabinetsDwg1-606042c79d87434d89d04dd82d1c7028.png)
Measuring your kitchen and adapting free plans
Accurate measurement makes the cabinet fit. Follow these steps.
- Measure wall length and height in three places.
- Note windows, doors, and appliances.
- Mark plumbing and electrical locations.
- Subtract filler spaces for walls that aren’t plumb.
- Match cabinet sizes from plans to your measurements. Adjust multiples of 3" or 6" for fillers.
When I installed my cabinets, one wall was out of square. I added a 1" filler at the end and scribed the toe kick to the floor. A small tweak early saved hours later.

Step-by-step build process (adapt these steps from your chosen free plans)
The core of how to build kitchen cabinets free plans is following a clear assembly workflow. Use these steps as a checklist.
- Cut and label all parts
- Follow the plan’s cut list.
- Label parts with a pencil and masking tape.
- Assemble cabinet boxes
- Drill pocket holes at edges.
- Glue and clamp sides to bottom and shelves.
- Attach back panel for square alignment.
- Square and clamp
- Check diagonals to confirm squareness.
- Adjust before glue sets.
- Add face frames or attach door mounting rails
- Use hardwood for face frames if plan calls for them.
- Fasten with glue and brad nails.
- Make or mount doors and drawers
- Use plywood or MDF doors from the plan.
- Install drawer boxes with dado joints for strength or use pre-made boxes.
- Sand, finish, and paint or stain
- Sand to 220 grit.
- Apply primer, then paint or stain.
- Install hardware and hinges
- Set hinge positions based on door style.
- Install drawer slides to manufacturer specs.
- Install cabinets in the kitchen
- Screw cabinets to wall studs.
- Level, shim, and fasten adjacent cabinets to each other.
I follow this process in nearly every build. It reduces rework. If you stick to it, you can finish a run of base cabinets in a weekend.
:max_bytes(150000):strip_icc()/CabinetsDwg2-1319246ccb9344b2ba1b390ebfc7c7aa.png)
Door styles, face frames, and veneer options
Free plans often let you choose door type. Choose one that matches your skill level.
- Slab doors: Simple, minimal trimming needed.
- Shaker doors: Classic look; requires rails and stiles.
- Raised panel doors: More complex; consider buying pre-made doors.
- Face frame vs. frameless: Face frame hides imperfections; frameless (European) gives full access.
I made shaker-style face frames on my first set. They look professional and were forgiving on fit.

Finishing tips for pro-looking cabinets
A good finish lifts the whole kitchen. Keep steps short and simple.
- Sand progressively from 120 to 220 grit.
- Use a de-glosser or tack cloth between coats.
- Apply a quality primer for painted cabinets.
- Spray finish when possible for an even coat. Brushing works too.
- Let finish cure fully before installing hardware.
I sprayed my cabinets in my garage. The finish looked like a cabinet shop job. Rent a sprayer if you don’t own one.

Installation and fitting advice
Installation can make or break a project. Follow these rules.
- Find and mark studs before hanging.
- Use a ledger board to support base cabinets during installation.
- Shim to level and square each cabinet.
- Join cabinets with clamps and screws through frames or rails.
- Attach countertops after cabinets are secure.
During one install I missed a stud. I used heavy-duty toggles for the sink cabinet. It held, but I recommend finding studs first.
Cost-saving tips and sourcing free plans
Sticking to free plans saves money, but there are more ways to cut cost.
- Buy plywood in full sheets and have cuts made at the store.
- Use off-the-shelf doors for complex styles.
- Reuse or repurpose old cabinet hardware.
- Shop local classifieds for surplus materials.
- Use MDF or plywood instead of solid wood for painted cabinets.
I saved over $400 by buying plywood seconds and using free plans. The cabinets looked great after paint.
Common mistakes and how to avoid them
Avoid these frequent errors I’ve seen and made myself.
- Rushing measurements. Measure twice, cut once.
- Skipping test assemblies. Dry-fit parts to avoid surprises.
- Ignoring squareness. A crooked box causes fit problems.
- Using wrong fasteners. Match fastener length to panel thickness.
- Not planning for appliances. Leave proper clearances.
One mistake I made was mounting doors before adjusting hinges. I had to remove them and re-finish edges. Don’t skip test fits.
How to adapt plans for custom kitchens
Free plans are templates. Here’s how to adapt them to your space.
- Scale widths by whole increments to fit your run.
- Add fillers for out-of-square walls.
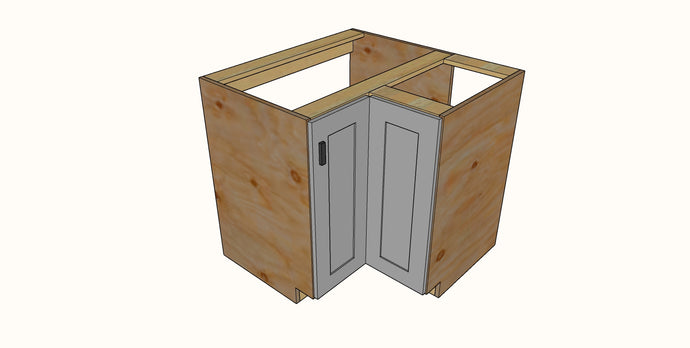
- Combine two plan types for specialty cabinets like tall pantries.
- Modify shelf spacing for appliance clearances.
I once combined a cabinet plan for a base and a tall pantry. The combined look was seamless.
Safety and sustainability considerations
Keep safety and the environment in mind while building.
- Use dust extraction and masks to limit dust inhalation.
- Dispose of finishes and solvents properly.
- Choose low-VOC paints and adhesives.
- Recycle scrap wood when possible.
I switched to low-VOC primer for a healthier finish and cleaner indoor air.
Project timeline and realistic expectations
How long should you expect? Time varies with skill and scope.
- Single base cabinet: 4–8 hours.
- Full 10-foot run of bases and uppers: 3–5 weekends.
- Painting and curing add days to the calendar.
I scheduled a weekend for box assembly and another for finishing. Add extra time for learning and corrections.
Personal lessons and tips from building cabinets
A few practical tips from my builds.
- Label everything. A small label saves confusion on reassembly.
- Build one prototype cabinet first. It acts as a test and reference.
- Use clamps generously. They keep parts tight during glue-up.
- Take photos during measurements. They help when you return later.
My prototype cabinet taught me hinge placement and saved door adjustments later.
Frequently Asked Questions of how to build kitchen cabinets free plans
How hard is it to build cabinets using free plans?
It’s manageable for a handy beginner. Start with simple box-style plans and work up to doors.
Can I adapt free plans to fit odd kitchen sizes?
Yes. Most plans scale by width increments and add fillers for odd walls.
What tools are essential for following free plans?
A circular or table saw, drill, pocket-hole jig, clamps, and a sander are the core tools.
Are free plans accurate for materials and cut lists?
Good free plans include cut lists and material notes. Verify thickness and dimensions before cutting.
How much can I save using free plans?
Savings vary, but many DIYers save 40–70% compared to custom cabinet shops, depending on materials and finish.
Conclusion
You can build beautiful, durable cabinets by using how to build kitchen cabinets free plans, the right materials, and careful steps. Start with a solid plan and build one prototype cabinet. Measure precisely, label parts, and take your time with finishes. With patience, free plans let you get a custom look at a fraction of the cost. Try a single cabinet first, then expand. If this guide helped, subscribe for more DIY cabinet tips or share your build story in the comments.


