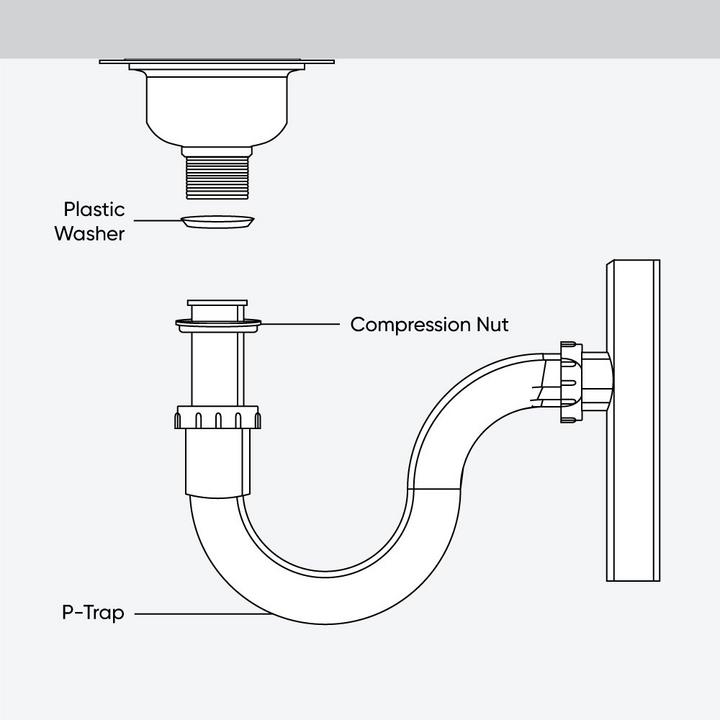
Install the sink flange, attach the tailpiece and P-trap, then tighten and test for leaks.
I have installed and replaced dozens of kitchen drains, and this guide walks you step by step through how to put in a kitchen sink drain with clear tools, simple techniques, and real-world tips. You will learn how to choose parts, prepare the sink, assemble the drain and P-trap, prevent leaks, and troubleshoot common issues. Read on for a practical, experience-based method to complete this job confidently and safely.
Tools and materials you need
A clear list makes the job faster. Below are common tools and parts for how to put in a kitchen sink drain.
- Adjustable wrench or channel-lock pliers for nuts and slip joints.
- Pipe wrench for stubborn fittings.
- Plumber's putty or silicone sealant for flange sealing.
- Slip-joint pliers and plumber’s tape (Teflon tape).
- New drain assembly (flange, basket strainer, tailpiece).
- P-trap kit or trap adapter to match drain pipe size.
- Bucket and rags to catch water and clean surfaces.
- Hacksaw if you need to cut a tailpiece or pipe.
Using the right parts makes how to put in a kitchen sink drain easier and prevents repeat work. Match pipe sizes and materials before you begin.
Prep work: shut water, clear space, check fit
Good prep prevents mistakes when you learn how to put in a kitchen sink drain.
- Turn off water to the sink if there are shutoffs. If not, just close the faucet and keep a bucket handy.
- Empty the cabinet and remove items under the sink. You need room to move and to lay parts out.
- Inspect the sink hole and old parts. Clean the sink rim and remove old putty or gasket material.
- Dry-fit new pieces to confirm lengths and fit before sealing anything.
A dry test run will save time and reduce leaks when you actually assemble the drain.

Step-by-step: how to put in a kitchen sink drain
Follow these steps in order to install a standard kitchen sink drain and P-trap. Each step stays short and clear.
-
Prepare the flange
- Roll plumber's putty into a rope about the size of your thumb.
- Press putty around the underside of the sink flange. If you prefer, use a bead of silicone sealant instead.
-
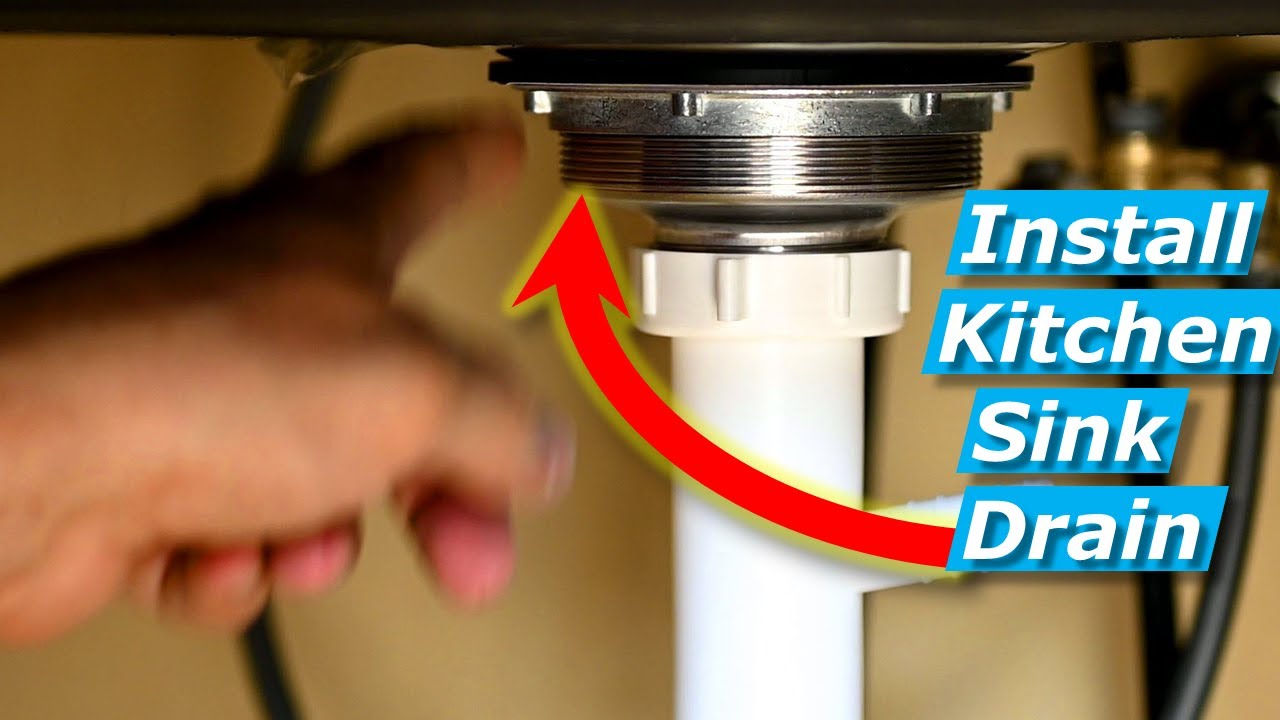
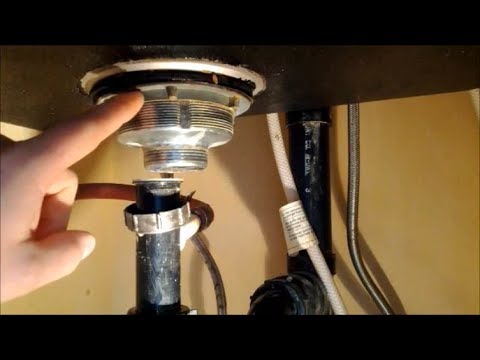
Insert the flange
- From above the sink, push the flange into the drain hole.
- Hold it in place while you work below the sink.
-
Attach the rubber gasket and nut
- From under the sink, slide on the rubber gasket, then the cardboard or fiber washer if provided.
- Thread on the large locknut and hand-tighten. Use a wrench for one more gentle turn.
-
Install the basket strainer or tailpiece
- If using a basket strainer, tighten its mounting nut and clean up excess putty around the flange.
- Attach the straight tailpiece to the flange with its slip nut and washer.
-
Connect the trap adapter and P-trap
- Slide the trap adapter onto the drain tailpiece and hand-tighten the slip nut.
- Fit the P-trap in place between the trap adapter and wall drain. Tighten slip nuts by hand and finish with pliers if needed.
-
Test for leaks
- Run water for several minutes and check all joints for drips.
- Tighten any slightly leaking nuts a bit more. If leaks persist, disassemble and reseat the washer or add plumber's tape.
When you follow these steps, how to put in a kitchen sink drain becomes a routine task. Keep parts snug, not over-tightened, to avoid cracking components.
/how-to-install-a-sink-drain-2718789-05-a2a602315a3d4d12a8ed20429230382c.jpg)
Common problems and troubleshooting
Knowing typical failures helps you avoid them while learning how to put in a kitchen sink drain.
-
Leaks at the flange
- Cause: Insufficient putty or a damaged gasket.
- Fix: Remove flange, clean surfaces, add fresh putty or replace gasket.
-
Drips from slip nuts
- Cause: Misaligned washers or loose nuts.
- Fix: Hand-tighten nuts, align pipes, replace worn washers.
-
Slow drain after installation
- Cause: Debris in the tailpiece or partially blocked P-trap.
- Fix: Remove trap and clean; flush with hot water and a mild cleaner.
-
Noisy drain or siphoning
- Cause: Poor venting or an incorrectly positioned trap arm.
- Fix: Verify trap slope and venting; if uncertain, consult a pro.
Troubleshoot step by step and test often when you put in a kitchen sink drain to catch issues early.

Maintenance and care after installation
A well-cared-for drain lasts longer and keeps your kitchen fresh.
- Clean the strainer weekly and remove food buildup.
- Avoid pouring grease straight into the sink; use a grease container.
- Inspect under-sink fittings every few months for drips.
- Replace washers and slip nuts when they show wear.
Regular checks cut down on emergency repairs and keep how to put in a kitchen sink drain a one-time fix for years.

Time, cost, and when to call a pro
Estimate time and budget for how to put in a kitchen sink drain and know when to bring in help.
- Time: Most DIY installs take 1 to 2 hours for an experienced homeowner. Less experienced people should allow 2 to 4 hours.
- Cost: A basic drain kit and P-trap usually cost $20 to $60. Specialty or stainless parts cost more.
- Call a pro when:
- The drain assembly doesn't match old plumbing and requires rework.
- You find corroded or damaged drain pipes.
- The drain connects to a garbage disposal that needs electrical or complex fitting work.
If you run into odd angles or leaks you cannot fix, a licensed plumber saves time and prevents water damage.
:max_bytes(150000):strip_icc()/how-to-install-a-sink-drain-2718789_hero_5078-64538f6f90d545c7af0728e4bf8f894e.jpg)
Personal experience, mistakes to avoid, and tips
I have installed kitchen drains in rental units and my own home. The lessons were simple but valuable when learning how to put in a kitchen sink drain.
- Lesson 1: Clean surfaces first
- Rushing past old putty once cost me a re-install. Remove old material fully.
- Lesson 2: Don't overtighten metal nuts
- I cracked a flange by using too much force. Tighten snugly and check for leaks.
- Lesson 3: Dry-fit parts every time
- Measuring and dry-fitting cut my install time in half.
- Tip: Keep a small tube of silicone on hand for stubborn spots.
- Tip: Label parts during disassembly to speed reinstallation.
These tips come from hands-on installs. They make how to put in a kitchen sink drain smoother and less stressful.
Frequently Asked Questions of how to put in a kitchen sink drain
What is the difference between plumber's putty and silicone for a sink flange?
Plumber's putty is traditional, easy to remove, and works well on metal. Silicone is more water-tight and better for stone or composite sinks but is harder to remove later.
Can I reuse the old P-trap when I install a new drain?
Yes, you can reuse a clean, undamaged P-trap. Replace it if it is corroded, cracked, or mismatched in size to ensure a good seal.
How tight should slip nuts be on a sink drain?
Hand-tighten slip nuts, then finish with a quarter to half turn using pliers. Over-tightening can crack fittings or compress washers too much.
What size tailpiece do I need for a kitchen sink drain?
Most kitchen sinks use a 1 1/2-inch tailpiece. Measure the existing pipe or the trap inlet to confirm the correct size before buying parts.
How long does it take to learn how to put in a kitchen sink drain?
A basic install can be learned in one afternoon with the right tools and a clear guide. Practice and careful prep make the process faster each time.
Conclusion
You now have a clear, practical path for how to put in a kitchen sink drain. The steps cover tools, prep, assembly, testing, common problems, and care. Take your time, dry-fit parts first, and use the right sealant for your sink material. Try the job yourself if the plumbing is straightforward, and call a professional if you face corrosion, odd fittings, or complex disposal hookups. If this guide helped, leave a comment, share your result, or subscribe for more DIY plumbing tips.


