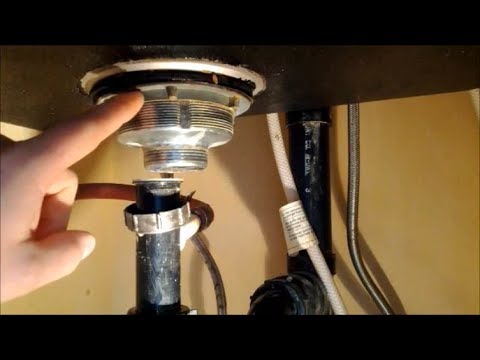
Remove the basket nut, disconnect the P-trap, unscrew the flange, and lift the drain out.
I’ve spent years doing home plumbing work and teaching homeowners how to remove a drain from a kitchen sink safely and cleanly. This guide explains how to remove drain from kitchen sink step by step, covers different drain types, lists tools, offers troubleshooting, and shares real tips I learned on the job so you can do it right the first time. Read on for clear, practical instructions you can follow with confidence.

Why remove the drain from a kitchen sink?
You might remove a drain to replace a worn flange, stop a leak, change a finish, or clean a stuck trap. Knowing how to remove drain from kitchen sink saves money and gets the job done faster.
Removing a drain also helps when installing a new sink or replacing a garbage disposal. The process is simple once you know the parts and steps.

Types of kitchen sink drains and why it matters
Different drains need slightly different removal steps. Knowing the type helps you pick the right tools and plan.
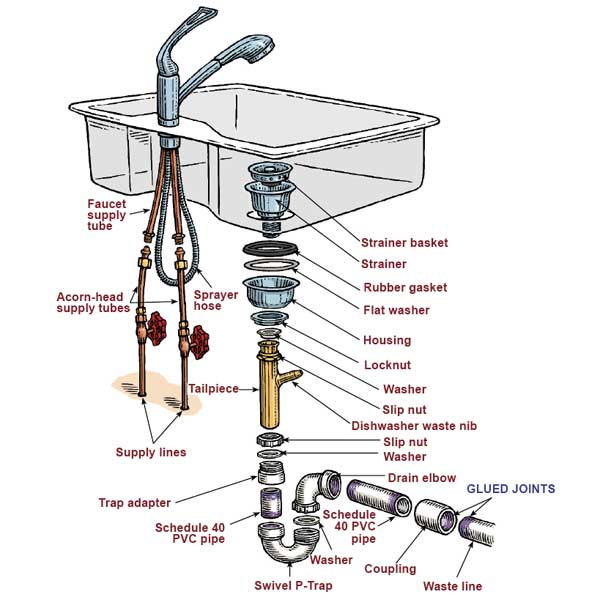
- Basket strainer drain: common in stainless sinks. It has a visible flange and a locknut under the sink.
- Pop-up drain: often used with bathroom but sometimes found in kitchens; uses linkage and a pivot lower down.
- Garbage disposal connected drain: you must disconnect the disposal first.
- Rubber stopper or lift-and-turn: simple top piece and threaded tailpiece.
How to remove drain from kitchen sink depends on the type you have. Inspect before you start.

Tools and materials you will need
Gather tools first. Working in a cramped cabinet is easier when you are prepared.
- Adjustable wrench
- Slip-joint pliers
- Basin wrench for tight nuts
- Bucket to catch water
- Towels or rags
- Putty knife or screwdriver to cut old putty
- Plumber’s putty or silicone for resealing
- Replacement gasket or flange if needed
Using the right tools speeds the job and lowers the chance of damage. For many sinks, a basin wrench is the most helpful tool for the locknut.

Step-by-step: how to remove drain from kitchen sink
Follow these steps for a typical basket strainer drain. If you have a garbage disposal, start by disconnecting it from the sink and power.
- Turn off water and clear cabinet
- Shut off the water supply valves if present.
- Empty the cabinet and put a bucket below the work area.
- Disconnect the P-trap
- Place the bucket under the trap.
- Loosen the slip nuts with pliers and remove the trap.
- Drain any water into the bucket.
- Unfasten the tailpiece and mounting nut
- Under the sink you will see the tailpiece and a large locknut or mounting nut.
- Use a basin wrench or adjustable wrench to loosen the nut.
- If the nut is corroded, spray a small penetrating oil and wait a few minutes.
- Detach the locknut and flanges
- Remove the locknut entirely.
- Push the tailpiece down and out through the sink hole.
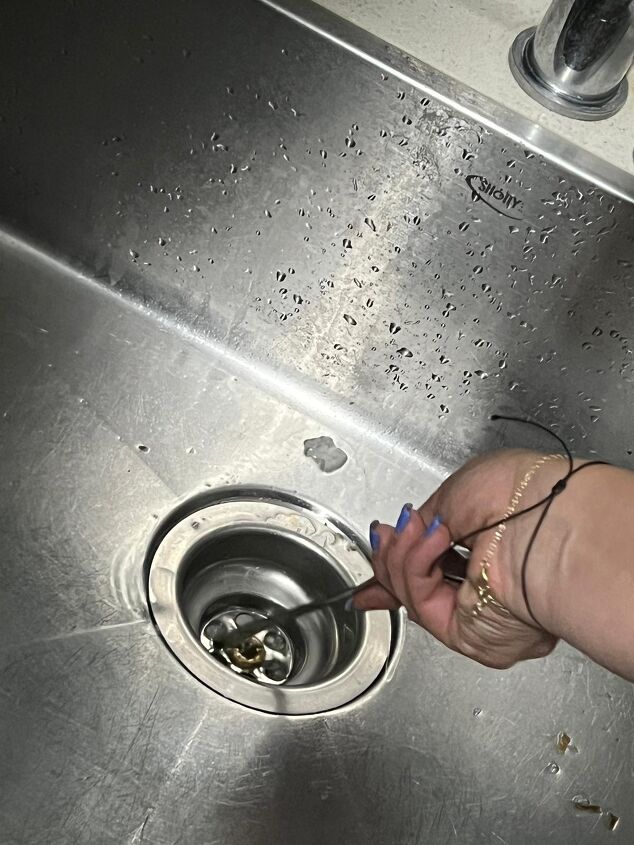
- From above, twist and lift the flange or basket strainer free.
- Clean the sink hole
- Scrape away old plumber’s putty or silicone with a putty knife.
- Wipe the area dry and inspect for damage.
- For garbage disposal connections
- Unplug or turn off power at the breaker.
- Loosen the disposal’s mounting ring and remove the disposal.
- Then follow the drain removal steps above for the sink flange.
How to remove drain from kitchen sink is often easier than you think. Work slowly and keep parts organized so reassembly is simple.

Troubleshooting and common problems
Stuck locknut
- Use penetrating oil and wait. Tap gently with a mallet to break corrosion.
- If it won’t budge, cut the nut with a rotary tool or hacksaw carefully.
Broken flange or rusted parts
- If the flange breaks, remove the remaining pieces and clean the hole.
- You may need a replacement flange and new plumber’s putty or silicone.
Leaks after reinstall
- Check that the gasket sits flat.
- Use plumber’s putty under the flange or silicone for stone sinks. Tighten the nut evenly.
How to remove drain from kitchen sink becomes a troubleshooting exercise when parts are old. Patience and the right tool solve most issues.
Safety tips and best practices
Work with the power off when a disposal is present. Always wear gloves and eye protection if cutting or scraping. Have towels and a bucket ready for spills.
Label or photograph connections before you disconnect them. That makes reassembly much easier. Follow local plumbing codes when replacing parts to stay compliant.
Personal experience: lessons learned
I once tackled a kitchen sink where the locknut was fused by old plumber’s putty and heat damage. I used penetrating oil and patience, but the big lesson was to photograph the setup first. That saved time when I reassembled the tailpiece and flange.
Another time, a homeowner used too much silicone and the flange was glued in. I had to carefully cut and pry it free without scratching the sink. Invest in a good putty knife. Installing new parts with a snug nut and correct gasket is key to prevent leaks.

Reinstalling or replacing the drain
When you install a new drain, test fit parts dry first. Apply a rope of plumber’s putty or a bead of silicone under the flange. Insert the drain from above, then tighten the locknut under the sink. Reconnect the tailpiece and P-trap, then run water and check for leaks.
If replacing with a different style, ensure the sink hole and flange size match. Some sinks require a flange adapter or sealant designed for stone or composite sinks.
PAA-style quick questions
Q: How long does it take to remove a kitchen sink drain?
- Most simple drain removals take 30–60 minutes for a DIYer. More time may be needed for corroded parts.
Q: Do I need to turn off the water?
- Yes. Turn off local shutoff valves or the main water if needed to avoid spills.
Q: Can I remove the drain without a basin wrench?
- In some cases yes, but a basin wrench makes it far easier. Slip-joint pliers can work for easy-to-reach nuts.
Frequently Asked Questions of how to remove drain from kitchen sink
How do I remove a stuck drain nut?
Use penetrating oil, wait, and use a basin wrench or a wrench with a long handle. As a last resort, carefully cut the nut.
Will removing the drain damage my sink?
If you work carefully and use the right tools, you should not damage the sink. Use a towel to protect finishes when using tools.
Do I need plumber’s putty to reinstall the drain?
Plumber’s putty is common for metal sinks. Use silicone for stone or composite sinks to prevent staining and secure the flange.
How do I remove a drain connected to a garbage disposal?
Turn off power, disconnect the disposal’s mounting ring, remove the disposal, then remove the drain flange as usual.
Can I remove the drain myself or should I call a plumber?
Most homeowners can remove a drain themselves with basic tools and patience. Call a plumber if parts are badly corroded or if you are unsure about electrical or drain connections.
Conclusion
Removing a drain from a kitchen sink is a doable DIY task when you know the parts, gather the right tools, and follow clear steps. Start by disconnecting the P-trap, remove the locknut, and lift the flange out, adjusting for specific drain types like garbage disposals. Take your time, protect finishes, and replace worn gaskets or putty to avoid future leaks. Try the steps on your sink this weekend and share your success or questions in the comments — and consider subscribing for more practical home plumbing guides.


