Use an ice-water and boiling-water test, plus a simple offset check, to confirm accuracy.
I’ve tested dozens of thermometers in home kitchens and pro grills, so I know what matters when checking accuracy. This guide shows exactly how to test a meat thermometer's accuracy at home, step by step, with clear tests, tips, and fixes you can use right now. Read on for easy instructions, real-life mistakes to avoid, and practical advice whether you have a probe, instant-read, or oven thermometer.

How to test a meat thermometer's accuracy at home: Step-by-step tests
Start with two basic checks: the ice-water test and the boiling-water test. These give quick, reliable reference points to see if your thermometer reads correctly.
-
What you need
- A glass or cup
- Crushed ice and cold water
- A pot of boiling water
- A towel or heatproof glove
- Your meat thermometer
-
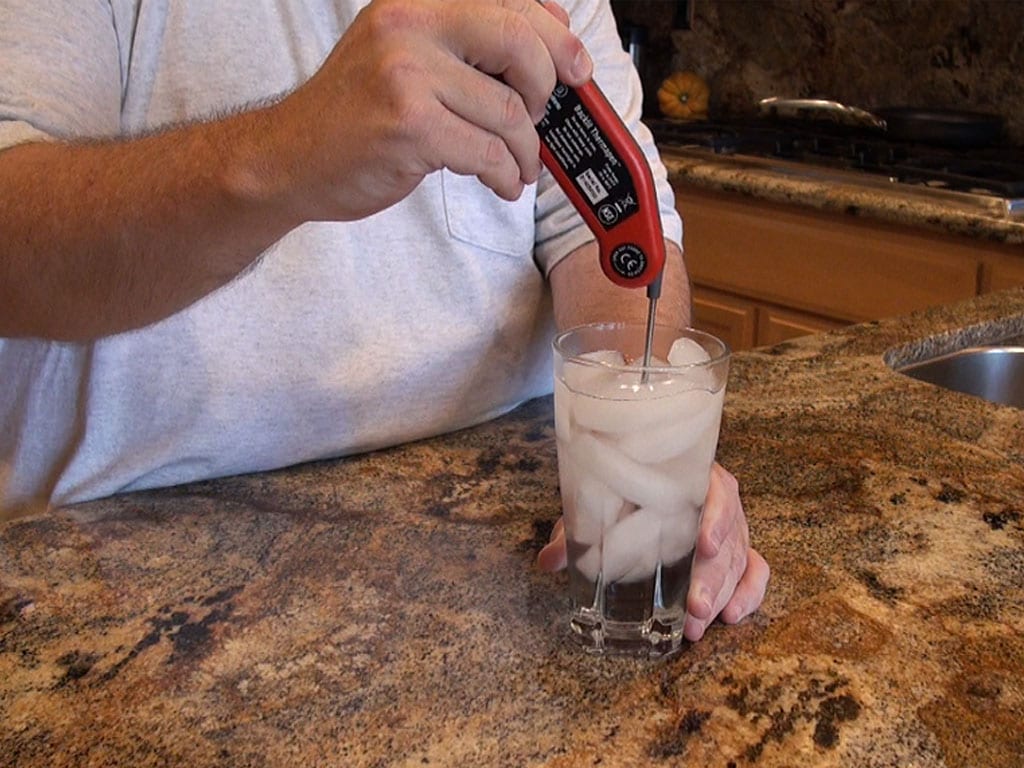
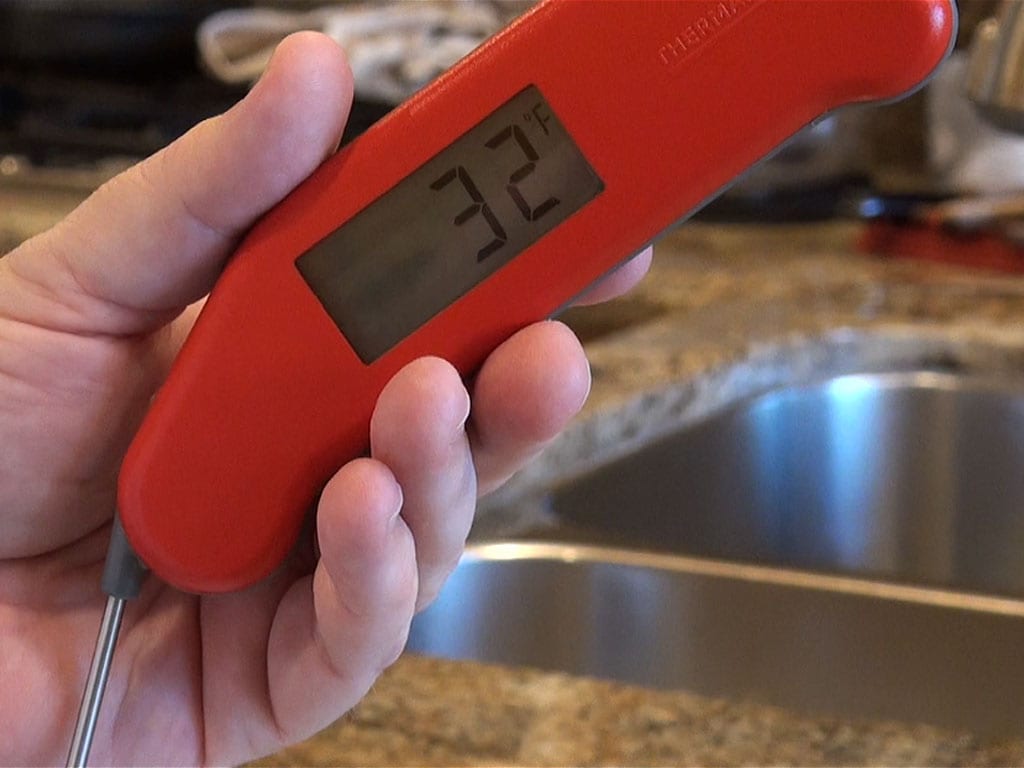
Ice-water test (checks 32°F / 0°C point)
- Fill a glass with crushed ice. Add cold water to fill gaps. Stir and wait 30 seconds.
- Insert the thermometer probe into the center of the ice slurry without touching glass sides.
- Wait until the reading stabilizes. It should read 32°F (0°C).
- If it reads slightly off, note the offset (example: reads 34°F = +2°F error).
-
Boiling-water test (checks boiling point, note altitude)
- Bring a pot of water to a rolling boil.
- Insert probe into boiling water without touching the pot sides or bottom.
- Wait for a steady reading. At sea level, expect 212°F (100°C).
- If you’re at high altitude, boiling temperature drops — use an altitude chart or subtract expected drop to set your reference.
-
Optional: Simmer or known-temp oil bath
- Use a controlled hot-water or oil bath at a mid-range temperature (140–160°F) to check accuracy in cooking range. This is helpful for sous-vide or smoking work.
How to record results
- Note reading at ice and boil tests.
- Calculate offset for each point and average if needed.
- If offsets differ by more than about 2–3°F across range, the thermometer may be unreliable.
How many times to repeat
- Run each test twice to confirm consistent results.
- If readings jump around, replace the unit.
:max_bytes(150000):strip_icc()/__opt__aboutcom__coeus__resources__content_migration__serious_eats__seriouseats.com__images__2016__10__20161008-meat-temp-5-e10885b8363b44bf825df1d9ae43a702.jpg)
Understanding thermometer types and accuracy factors
Different thermometers behave differently. Knowing types helps you test correctly.
-
Instant-read digital probe
- Fast readings, accurate when probe depth and placement are correct.
- Best checked with ice and boiling tests and mid-range baths.
-
Oven probe / leave-in probe
- Designed to be left in food and tolerate oven heat.
- Test outside the oven first, then check under expected cooking conditions.
-
Dial (analog) thermometers
- Mechanical and sometimes slower to stabilize.
- Often less precise; a 2–3°F error is common.
Key accuracy factors
- Probe depth
- Many probes need a specific insertion depth to read core temperatures properly. Always insert to recommended depth.
- Probe tip shape and thickness
* Thin tips respond faster but can be less stable; thick tips average more but take longer. - Placement in food
- Avoid bones and fatty pockets. Insert into the thickest part of meat for true core temperature.
- Environmental effects
- Altitude changes boiling point; cold ice water is a stable standard regardless of elevation.
Personal tip: I once tested a digital probe that read perfectly in ice water but was 6°F off in hot oil. That taught me to check both ends of the temperature range when assessing a unit.

How to calibrate or adjust your thermometer at home
Many digital thermometers let you adjust for an offset. Others require you to use the offset mentally or replace the unit.
-
Calibrating digital models
- Run the ice-water test and note the offset (example: reads 34°F = +2°F).
- If your thermometer has a calibration/offset function, follow the device instructions to subtract the offset.
- Re-test to confirm.
-
Calibrating analog dial thermometers
- Tighten or turn the calibration nut (usually on the back) while in ice water until it reads 32°F.
- Re-check both ice and boil points if possible.
-
When calibration isn’t possible
- Keep a small note of the offset and mentally add or subtract this during cooking.
- If errors are large or inconsistent, replace the thermometer.
Practical tip: After calibrating, label the thermometer with the test date and offset. That way you know when to re-check.
Troubleshooting and best practices
If your thermometer seems inaccurate, follow these steps to diagnose and fix the problem.
-
Common causes of bad readings
- Dirty probe — always clean before testing.
- Poor battery — replace or charge batteries.
- Damaged probe or cord — physical damage leads to errors.
- Wrong placement — touching a pan or bone skews readings.
-
Quick fixes
- Clean probe with hot soapy water, rinse, and dry.
- Swap batteries and re-test in ice water.
- Try a different testing method (boil vs. ice) to isolate the issue.
-
When to replace a thermometer
- Inconsistent readings across repeated tests.
- Errors greater than 2–3°F for digital, or larger than acceptable for your cooking needs.
- Visible damage, corrosion, or failure to calibrate.
Real-world advice: I once trusted a dial thermometer that was off by 10°F. After one ruined roast, I switched to a reliable instant-read digital and now test new thermometers right away. It saved time and food.

How often to check and maintain accuracy
Regular checks keep you confident in food safety and taste.
-
Frequency
- Check new thermometers before first use.
- Re-check every 1–3 months if used often, or after being dropped.
- Re-check before big meals and special events.
-
Maintenance tips
- Store in a dry place away from heat.
- Clean after each use and sanitize between different foods.
- Replace batteries yearly or as needed.
-
Safety thresholds
- For safe cooking, most guidelines allow ±2°F accuracy for critical temperatures like poultry. Aim for a thermometer that stays within that range.
People Also Ask — quick questions
Q: Will altitude affect my boiling-water test?
A: Yes. Higher altitude lowers water’s boiling point. Use an altitude correction chart or prefer the ice-water test for a universal reference.
Q: Can I use the oven to test a thermometer?
A: You can check a thermometer in the oven at a set temperature, but ovens vary widely. Use an independent ice-water or calibrated bath for best results.
Q: How long should I wait for a stable reading?
A: Digital instant-read probes usually stabilize in 3–10 seconds. Dial thermometers may take 30 seconds or longer.
Q: Is a 3°F error acceptable?
A: For most home cooks, 2–3°F is fine. For precise jobs like sous-vide, tighter accuracy is preferable.
Q: Can I test a wireless thermometer the same way?
A: Yes. Test the probe itself in ice and boiling water, and check the transmitter separately if readings differ when connected.

Frequently Asked Questions of How to test a meat thermometer's accuracy at home
How often should I test my thermometer at home?
Test new thermometers before first use and check them every 1–3 months with an ice-water test or after any drop or damage. Test again before big meals or when accuracy matters.
What if my thermometer reads differently in ice and boiling water?
Small differences are normal due to device tolerance. If the offset is large or inconsistent, try calibrating or replace the thermometer if it won’t stabilize.
Can I rely on the boiling-water test at high altitude?
Boiling point drops with altitude, so adjust your expected temperature based on elevation or use the ice-water test for a consistent baseline. An altitude chart helps convert boiling-point results.
How do I clean and care for my thermometer during testing?
Wipe the probe with hot soapy water, rinse, and sanitize before and after tests. Avoid submerging digital units beyond their waterproof rating.
What counts as a failing thermometer?
If readings are inconsistent, jump around, or stay off by more than about 2–3°F for digital units, consider replacing it. Visible damage or inability to calibrate also indicate failure.
Conclusion
Testing a meat thermometer's accuracy at home is simple, fast, and worth the few minutes it takes. Use the ice-water and boiling-water tests, check mid-range temperatures when needed, and calibrate or replace units that show consistent, large errors. A well-tested thermometer protects food safety and elevates your cooking confidence. Try these tests today, label your device after calibration, and leave a comment below about your experience or questions — and subscribe for more practical kitchen tips.


