Replace a kitchen sink drain by removing the old flange, cleaning seals, and installing a new drain assembly.
I have replaced dozens of drains in kitchen sinks over the years, both as a DIYer and while helping friends and clients. In this guide I explain how to replace drain in kitchen sink step by step, with clear tools lists, safety tips, troubleshooting, and real-world advice. Read on for practical instructions, common pitfalls, and time and cost estimates so you can finish the job with confidence.

Tools and materials you will need
You can replace a drain in kitchen sink with simple tools. Gather everything before you start to avoid delays.
- Slip-joint pliers: For loosening slip nuts on drain trap.
- Pipe wrench or basin wrench: Useful for tight nuts under the sink.
- Plumber’s putty or silicone sealant: Seals the flange to the sink.
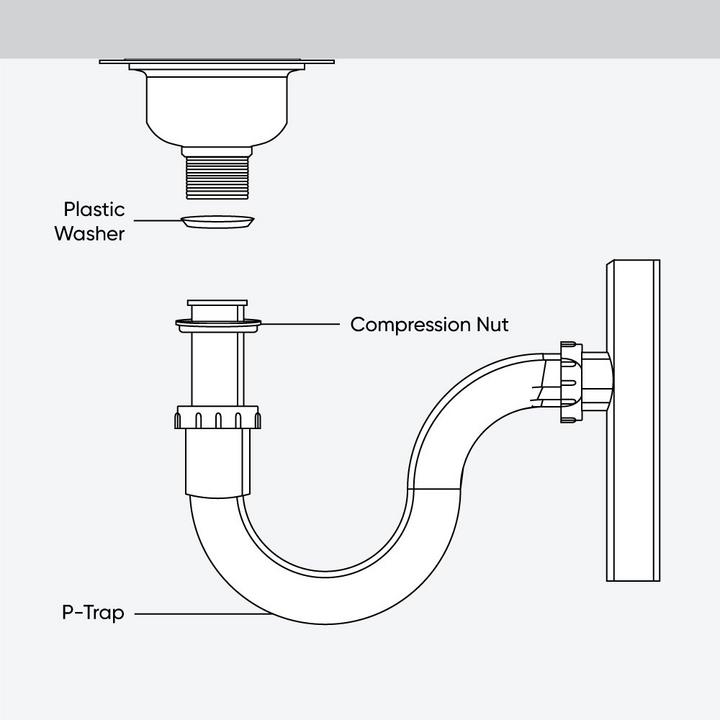
- New sink drain kit: Includes flange, rubber gasket, paper gasket, locknut, and tailpiece.
- Bucket and rags: Catch water and wipe surfaces.
- Utility knife: Remove old putty and cut tape.
- Teflon tape: For threaded connections if needed.
- Wire brush or rag: Clean old sealant and debris.

When to replace vs repair the drain
Deciding whether to replace or repair matters. Minor leaks at the trap or a loose slip nut often mean repair. If the flange is corroded, cracked, or the drain is clogged repeatedly, replacement is best.
Common causes that trigger replacement include:
- Persistent leaks at the sink flange or tailpiece.
- Corrosion or pitting on metal parts.
- Old or hardened gaskets that no longer seal.
- Replacing sink or upgrading to a new drain finish.
Replacing the drain solves many issues and can prevent hidden water damage. I recommend replacement if the drain is over 10 years old or shows visible damage.

Preparing the sink area and safety steps
Preparation saves time and reduces mess. Turn off the water supply and clear the area under the sink.
- Turn off cold and hot water valves: Shut them fully before you start.
- Place a bucket under the P-trap: This catches residual water.
- Clear cabinets: Remove items so you can work freely.
- Wear gloves and safety glasses: Old putty and debris can irritate skin and eyes.
Double-check you have the correct drain size and type for your sink. Most kitchen sinks use a 3.5-inch drain opening, but confirm before buying parts.
Step-by-step: how to replace drain in kitchen sink
Follow these clear steps to replace drain in kitchen sink. Work methodically and check seals at each stage.
-
Remove the old drain assembly
-
Place the bucket under the P-trap and loosen the trap’s slip nuts with pliers.
-
Remove the trap and tailpiece; empty the water into the bucket.
-
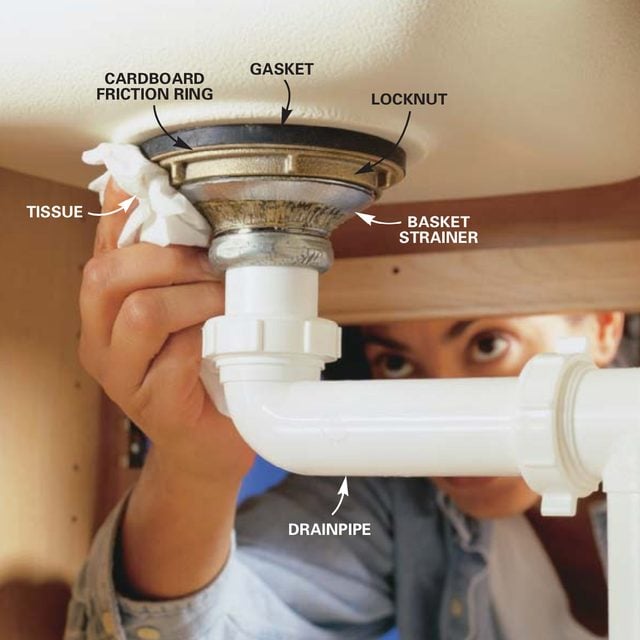
From under the sink, loosen the drain locknut holding the drain flange.
-
From above, push up and twist the old flange to remove it. Scrape away old putty.
-
Clean the sink opening
-
Use a putty knife or rag to remove old plumber’s putty and grime.
-
Clean around the opening with a mild cleaner and let it dry.
-
Inspect the sink rim for chips or damage.
-
Assemble the new drain
-
Apply a thin rope of plumber’s putty around the underside of the new flange. If using silicone, follow the product cure time.
-
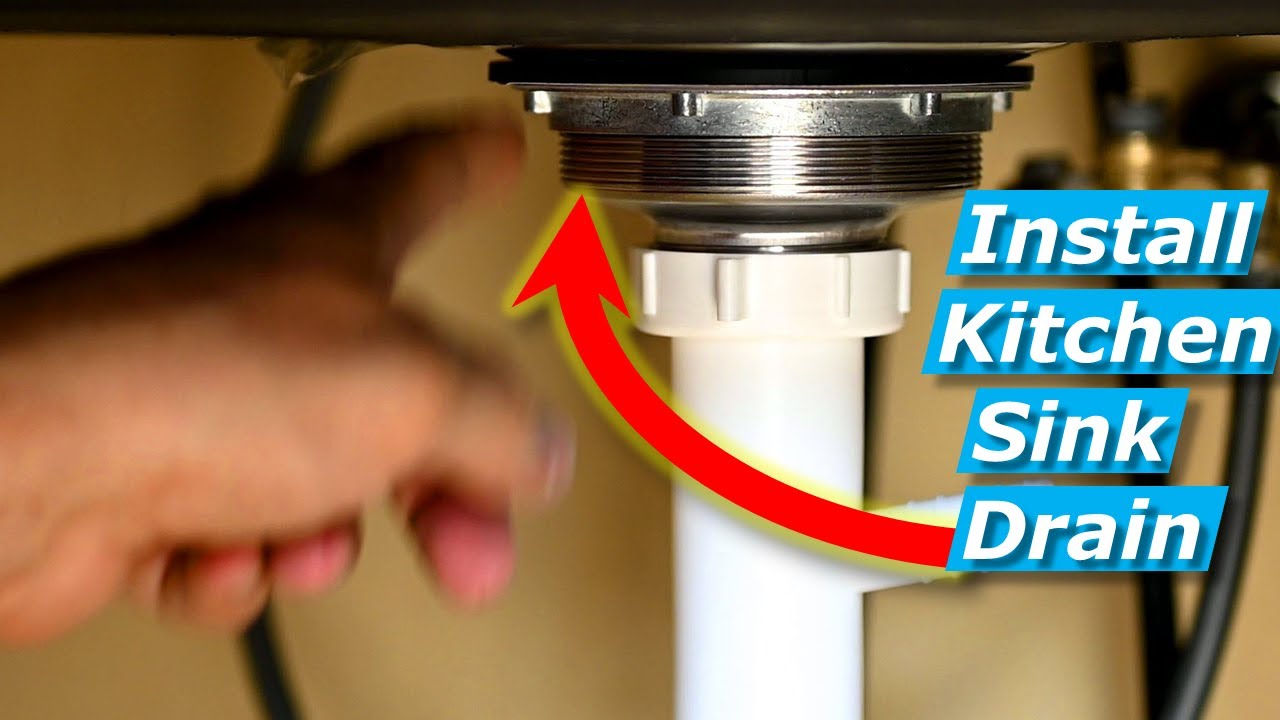
Insert the flange into the sink opening from above and press firmly.
-
From below, slide the rubber gasket and paper gasket onto the tailpiece. Thread on the locknut and tighten by hand.
-
Tighten and test for leaks
-
Tighten the locknut with a basin wrench until snug; do not over-tighten or crack the sink.
-
Reattach the tailpiece and P-trap, hand-tightening slip nuts then giving a quarter turn with pliers.
-
Run water and check for leaks around the flange and trap. Tighten slightly if needed.
-
Final cleanup and sealing
-
Remove excess plumber’s putty from around the flange.
-
If you used silicone, allow recommended curing time before heavy use.
-
Recheck all connections after 24 hours.
Common pitfalls to avoid:
- Overtightening the locknut and cracking the sink or flange.
- Forgetting the paper gasket; it helps center and seal the tailpiece.
- Using too much putty; this leads to messy cleanup.

Common problems and how to fix them
Knowing likely problems saves time. Here are common issues and quick fixes when you replace drain in kitchen sink.
- Leak at the flange after installation
- Tighten the locknut slightly and ensure the putty or silicone sealed evenly.
- Leaky slip joints on the P-trap
- Replace the slip washer or ensure the nut is snug and aligned; don’t overtighten.
- Drain assembly spins when tightening
- Hold the flange from above or have a helper press down while you tighten the nut below.
- New drain doesn’t fit
- Confirm the sink opening size. You may need an adapter or a different drain kit.
Cost, time estimate, and parts compatibility
Replacing a drain in kitchen sink is budget-friendly and usually quick. Expect parts and time as follows.
- Typical parts cost: $15 to $60 for a standard drain kit. High-end finishes cost more.
- Time estimate: 45 minutes to 2 hours for most DIYers.
- Compatibility tip: Most kitchen drains are 3.5 inches, but sinks with garbage disposals use different tailpieces. Check measurement before you buy.
If you need specialized parts like a disposal flange or dishwasher tailpiece, plan for added time and cost.
Personal tips and lessons learned from experience
I replaced my first kitchen sink drain with imperfect tools and learned a few things. These tips will help you avoid my early mistakes.
- Have the right wrench: A basin wrench makes upper locknuts much easier.
- Test fit dry first: Dry-assemble parts to ensure fit before applying putty or silicone.
- Work slowly on older sinks: Old metal can be brittle; take care loosening corroded nuts.
- Keep spare gaskets: Slip washers and gaskets are cheap and often save a second trip to the store.
These small habits cut frustration and make the process smooth and repeatable.

Quick search-style questions
What follows are short answers to common quick queries about how to replace drain in kitchen sink.
- How long does it take to replace a kitchen sink drain?
- Most jobs take under two hours for a DIYer. Allow more time if parts are corroded or hard to reach.
- Do I need a plumber to replace a drain?
- You can replace many drains yourself if you are comfortable with basic tools. Call a plumber if plumbing codes or disposal connections complicate the job.
- Can I use silicone instead of plumber’s putty?
- Yes; silicone forms a strong seal but needs curing time. Plumber’s putty is easier for immediate cleanup.

Frequently Asked Questions of how to replace drain in kitchen sink
How do I know the drain size for my kitchen sink?
Most kitchen sinks use a 3.5-inch drain opening. Measure the diameter of the sink hole to be sure before buying a kit.
Can I replace the drain without removing the sink?
Yes. You can replace the drain from below and above while the sink stays in place, though some installs are easier with the sink removed.
What sealant is best for the sink flange?
Plumber’s putty is traditional and easy to work with; silicone is more durable but needs curing time. Choose based on your preference.
How do I stop the trap from leaking after replacement?
Ensure the slip washers are seated and the nuts are hand-tight plus a small wrench turn. Replace old washers if leaks persist.
Do I need to replace the P-trap when I replace the drain?
Not always. Replace the P-trap if it is corroded, damaged, or if it uses an incompatible connection. Replacing it is inexpensive and can prevent future leaks.
What if the new drain kit doesn’t align with the garbage disposal?
You may need an adapter or a different tailpiece designed for disposal connections. Check the disposal manufacturer’s specs.
Conclusion
Replacing a drain in kitchen sink is a doable DIY project that saves money and prevents water damage. Follow the steps, use the right tools, and take your time when sealing and tightening connections. If you run into unexpected issues, a quick call to a licensed plumber can prevent costly mistakes. Try the steps this weekend, share your result, and leave a comment if you have questions or want help picking parts.


