Install a kitchen sink drain by gathering tools, removing the old drain, fitting the new parts, and testing for leaks.
I have guided homeowners and done this job myself many times, so I know what works and what trips people up. This article walks you through how to install a kitchen sink drain step by step. You will get clear tool lists, safety tips, common mistakes, and troubleshooting advice. Read on to learn practical, tested steps you can use today to install a kitchen sink drain with confidence.

Tools and materials you need to install a kitchen sink drain
Before starting, collect the right tools and parts. This saves time and prevents mistakes when you learn how to install a kitchen sink drain.
- Adjustable wrench or basin wrench for tight nuts
- Plumber’s putty or silicone sealant depending on drain type
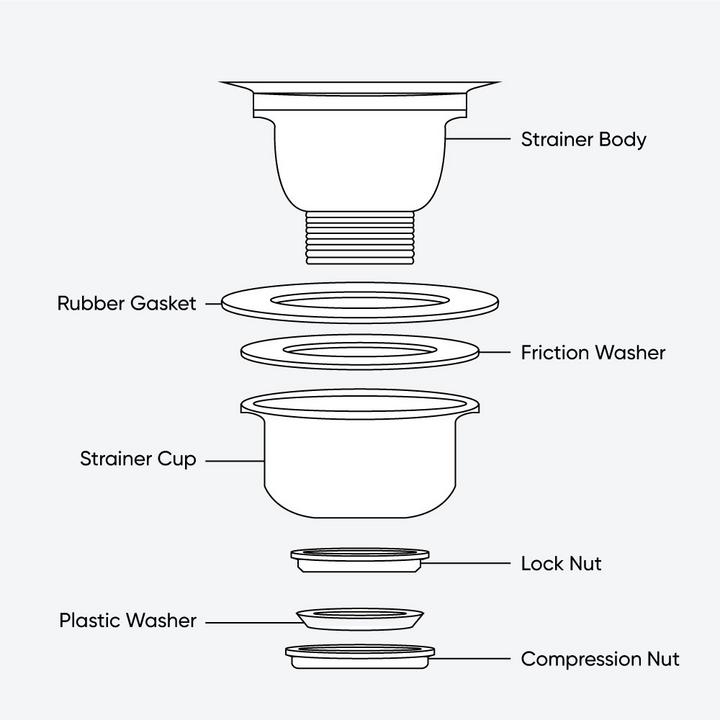
- New drain assembly (strainer, tailpiece, gaskets, locknut)
- Slip-joint pliers
- Bucket and rags to catch water
- Hacksaw or tubing cutter for trimming tailpiece if needed
- Tape measure and pencil for alignment
* Pipe joint compound or Teflon tape for threaded joints - Safety glasses and gloves
Having parts that match your sink type matters. If you have an undermount sink, choose a drain designed for that installation. When you follow this checklist, the actual work goes faster and cleaner.
Preparing the sink and workspace to install a kitchen sink drain
Preparation makes the job simple. Turn off water and clear under-sink space. Place a bucket under the trap to catch residual water.
- Shut off the water at the valves or main shutoff.
- Clear the cabinet under the sink for access.
- Place towels or a drop cloth to protect cabinetry.
- Put on safety glasses and gloves.
- Inspect the sink hole and old drain parts for corrosion.
If you are replacing an old drain, check the sink surface for damage. A clean, flat area around the drain hole helps create a good seal. Good prep prevents leaks and frustration when you learn how to install a kitchen sink drain.
/how-to-install-a-sink-drain-2718789-05-a2a602315a3d4d12a8ed20429230382c.jpg)
Removing the old drain safely
Removing the old parts correctly keeps the sink and pipes intact. This step is essential when you want to know how to install a kitchen sink drain.
- Put a bucket under the trap. Loosen slip nuts with pliers.
- Disconnect the trap and set it aside. Remove trapped water carefully.
- Unscrew the drain flange locknut from below the sink. Use a basin wrench if needed.
- Push up and twist the old drain flange to remove it. Clean old sealant from sink hole.
Take pictures before you remove parts. Photos help you match pieces and reassemble correctly. I once forgot to note an offset washer and spent extra time figuring it out. Small steps like pictures save time.
Step-by-step: How to install a kitchen sink drain (the full process)
Follow these steps in order. Each step is short and clear. This is the heart of learning how to install a kitchen sink drain.
-
Dry-fit the new parts
- Assemble the drain parts by hand without sealant. Check fit and alignment.
- Measure the tailpiece length and trim if it hits the trap or wall.
-
Apply sealant to the drain flange
- For metal sinks and many strains, place a rope of plumber’s putty under the flange base.
- For porcelain or other sensitive finishes, use a thin bead of silicone instead to avoid staining.
-
Insert the drain flange
- Press the flange into the sink hole firmly. Wipe excess putty away.
- From below, slide the gasket and friction washer onto the tailpiece.
-
Tighten the locknut
- Thread the locknut onto the tailpiece and tighten by hand. Use a basin wrench to finish snugly.
- Do not over-tighten. Over-tightening can crack the sink or squeeze out too much sealant.
-
Attach the tailpiece and trap
- Connect the tailpiece to the trap arm and reinstall the trap with slip nuts.
- Use Teflon tape or pipe compound on threaded joints if needed.
-
Test for leaks
- Run water and fill the sink. Check all joints and the area under the flange.
- Tighten minor leaks slowly. If a leak persists at the flange, drain and re-seat with fresh putty.
When you follow these steps, you will know how to install a kitchen sink drain without guesswork. I learned to avoid overtightening. It saves both parts and patience.
:max_bytes(150000):strip_icc()/how-to-install-a-sink-drain-2718789_hero_5078-64538f6f90d545c7af0728e4bf8f894e.jpg)
Common mistakes and how to avoid them when you install a kitchen sink drain
Knowing the usual pitfalls keeps the job quick and clean. These tips come from hands-on experience and common plumbing practice.
- Using the wrong sealant for the sink material can stain or fail. Use silicone for porous finishes.
- Overtightening the locknut can warp or crack the sink. Tighten just enough for a seal.
- Skipping a test run lets small leaks turn into big problems. Always test with water for several minutes.
- Not measuring tailpiece length leads to misfit and stress on joints. Dry-fit first.
- Re-using old gaskets often causes leaks. Replace rubber parts when installing a new drain.
A simple habit is to hand-tighten first, then add a quarter turn with a wrench. This prevents most issues when you install a kitchen sink drain.

Troubleshooting and repairs after installing a kitchen sink drain
If you find leaks or slow drains, try these checks first. Quick fixes often solve the problem.
- Leak at flange: Remove drain, clean surfaces, reapply putty or silicone, retighten.
- Leak at trap connections: Slightly loosen, reseat washers, and tighten evenly.
- Slow drain: Check for debris in the tailpiece or trap. Remove and clean.
- Persistent leak on threaded joints: Use pipe joint compound or fresh Teflon tape and retighten.
If a leak persists despite these attempts, the locknut or tailpiece might be damaged. Replace the faulty part. Calling a plumber is wise if leaks continue after these steps.

Benefits and limitations of installing your own kitchen sink drain
Doing this work yourself has upsides and limits. Know both before you begin.
- Saves money on labor.
- Lets you upgrade to a better drain or finish.
- Fast for simple replacements.
Limitations
- Complex or corroded plumbing may need a pro.
- Poor installation risks water damage.
- Local codes may require a licensed plumber for certain repairs.
My rule is to DIY small replacements and call a pro for major pipe work. This balance kept my projects safe and affordable.

Common quick questions (PAA-style)
Here are short answers to common quick questions about how to install a kitchen sink drain.
How long does it take to install a kitchen sink drain?
A simple replacement usually takes 30 to 60 minutes. Complex setups or stuck parts can take several hours.
Do I need plumber’s putty or silicone to install a kitchen sink drain?
Use plumber’s putty for metal sinks and silicone for porous or finished surfaces. Follow the drain maker’s instructions.
Can I reuse the old drain parts?
You can reuse clean, undamaged metal parts, but replace rubber gaskets and corroded pieces. New seals help prevent future leaks.

Personal tips and lessons from hands-on experience
I installed my first kitchen sink drain with a cheap socket set and learned a few hard lessons. Here are practical tips from that work.
- Always dry-fit before sealant. It helps you spot alignment issues.
- Take a photo before disassembly. It helps when reassembling.
- Keep the correct size wrenches handy. A basin wrench saves time under tight clearances.
- Use a small amount of sealant. Excess makes a mess and hides problems.
- Test with a full sink, not just running water. It reveals slow leaks.
These small habits made future installs easier and less stressful. They work whether you are a beginner or an avid DIYer.
Frequently Asked Questions of how to install a kitchen sink drain
What tools are essential to install a kitchen sink drain?
Essential tools include a basin wrench, adjustable wrench, plumber’s putty or silicone, slip-joint pliers, and a bucket. These tools handle most drain installations.
How do I seal the drain to prevent leaks?
Use plumber’s putty under the flange for metal sinks. Use silicone for finished or porous sinks. Tighten the locknut evenly and test for leaks.
Can I replace a kitchen sink drain without removing the sink?
Yes. Most drain replacements are done from below without removing the sink. You must access the locknut and tailpiece under the sink.
Is it better to use plumber’s putty or silicone?
Plumber’s putty is standard for metal sinks. Silicone is safer for porous or painted surfaces. Follow the drain manufacturer’s guidance.
When should I call a professional plumber?
Call a pro if pipes are corroded, the trap is stuck, local codes require a license, or leaks persist after your repairs. Complex jobs can lead to water damage if done wrong.
Conclusion
Installing a kitchen sink drain is a task you can do with simple tools, clear steps, and patience. Start by gathering tools, dry-fitting parts, and choosing the right sealant. Follow the step-by-step process here, test carefully, and avoid common mishaps like overtightening and reusing old seals. Take photos, measure, and work slowly.
Try the steps on a small replacement first. If things go well, you’ll save money and gain confidence. If you hit a tough problem, get professional help. If this guide helped you, leave a comment with your experience or subscribe for more clear, hands-on home tips.


