
Install a sidewall vent or an AAV, or tie into the main stack to vent under the window.
I’ve spent years renovating kitchens and solving tricky venting problems. This guide shows exactly how to vent a kitchen sink under a window, step by step, with code-aware options, cost notes, and real-world tips you can trust.
Why proper venting matters for a kitchen sink under a window
Proper venting prevents slow drains, gurgling traps, and sewer gas. A vent keeps water flowing by letting air into the drain line. When a sink sits under a window, routing that vent needs care to avoid drilling through the window header or breaking codes.
Venting errors cause odor, trap siphon, and backups. Fixes are often more costly than doing it right the first time. This guide explains safe options, code-friendly choices, and simple checks you can use when planning.
Common ways to vent a kitchen sink under a window
You have a few safe choices depending on layout, local code, and access. Each option has pros and cons. Pick the one that fits your space and code.
- Sidewall vent through the exterior wall
- Works well if the sink is near an outside wall below the window.
- Must slope and rise correctly to the vent opening above the flood level rim or per code.
- Air admittance valve (AAV)
- AAVs let air into the pipe but do not vent to the outside.
- Allowed by many codes for island sinks or under-window installs when a vertical vent is impractical.
- Re-route to the vertical soil stack
- Tie the sink vent into an existing vertical stack.
- Usually the most code-friendly but can require opening cabinets and walls.
- Loop vent or reconfigured trap arm
- Create a re-vent or loop that connects back to a vent before it goes horizontal.
- Requires careful slope and correct distances to avoid siphon.
I’ll walk you through choosing the best method. Keep in mind whether your local plumbing authority allows AAVs or requires through-the-wall vents.

Step-by-step: How to vent a kitchen sink under a window
Follow these steps for the most common solution: a sidewall vent. If you choose an AAV or tie-in, I’ll note differences.
- Plan and measure
- Measure the trap arm length and distance to the exterior wall or stack.
- Check local code for maximum horizontal vent distance for 1-1/4" or 1-1/2" drains.
- Locate a safe drill point
- Avoid studs, wiring, and window framing.
- Mark the hole so the vent will exit above the flood rim height or per code.
- Cut the hole and flash
- Use the correct size hole saw for the vent pipe.
- Install a flashing plate and silicone to keep water out.
- Run the vent pipe
- Use approved materials (PVC/ABS/CPVC).
- Slope horizontal runs at 1/4" per foot back to the drain and maintain proper rise to the vent termination.
- Connect to the sink drain
- Use a proper sanitary tee or wye fitting.
- Keep trap weir height and distances within code.
- Terminate and cap
- For sidewall vent, terminate with a vent cap of the right type.
- For AAVs, mount the device inside the cabinet above the trap arm, level, and accessible.
- Test the system
- Run several gallons of water and listen for gurgles.
- Use a smoke test or pressure test if required by code.
If you choose an AAV, skip exterior drilling and mount the AAV 4–6 inches above the trap or as code requires. If tying to the stack, open the chase and install a proper vent connection with accessible cleanouts.
People also ask
- Can you vent a sink under a window with an AAV?
- Yes. An AAV often works when exterior venting is hard. Check local code since some jurisdictions allow AAVs only in specific cases.
- How high must a sidewall vent be above the window?
- The vent must terminate above the flood-level rim or per code specifics. Keep it clear of windows, doors, and closeable openings where sewer gas could enter.
Tools, materials, and typical costs
Tools you need:
- Hole saw and drill
- PVC/ABS cutter and primer/solvent
- Level and tape measure
- Adjustable wrench and pliers
- Silicone sealant and flashing
Materials commonly used:
- 1-1/2" or 2" vent pipe and fittings
- Exterior vent cap or AAV
- Flashing and stainless screws
- Cleanout fittings where required
Typical cost range:
- AAV device: low cost, often $15–$50.
- Sidewall vent materials: $30–$150 depending on pipe and cap.
- Labor: a plumber may charge $200–$800 depending on access and wall work.
- Permit and inspection: varies by locality; budget $50–$200.
Costs rise if you must reframe a window, chase a wall, or tie into a stack. AAVs are cheaper but may not be allowed by your local authority.

Code basics and best practices for venting under a window
Know these code-aware rules before you act:
- Vent size and distance: keep trap arm lengths within allowable limits for the pipe size.
- Vent termination: do not terminate vents where airborne contaminants can enter a building or near operable windows as per local rules.
- Accessibility: keep AAVs and cleanouts accessible for service.
- Permits: many jurisdictions require a permit and inspection for plumbing changes.
I recommend checking local plumbing code or calling your local building department. Codes differ. A job done to code saves time and money later.

Common mistakes and troubleshooting when you vent a kitchen sink under a window
Avoid these errors:
- Running vent too flat so it traps water and clogs.
- Terminating the vent too close to an operable window where sewer gas can re-enter.
- Installing an AAV in a location below required heights or outside of code allowances.
- Using the wrong fittings; using a street elbow where a sanitary tee is needed.
Troubleshooting tips:
- Gurgling sounds mean air can’t enter; check vent slope and AAV function.
- Slow drain may mean partial blockage or improper trap arm length.
- Odor near the window could indicate vent termination too close to an opening.
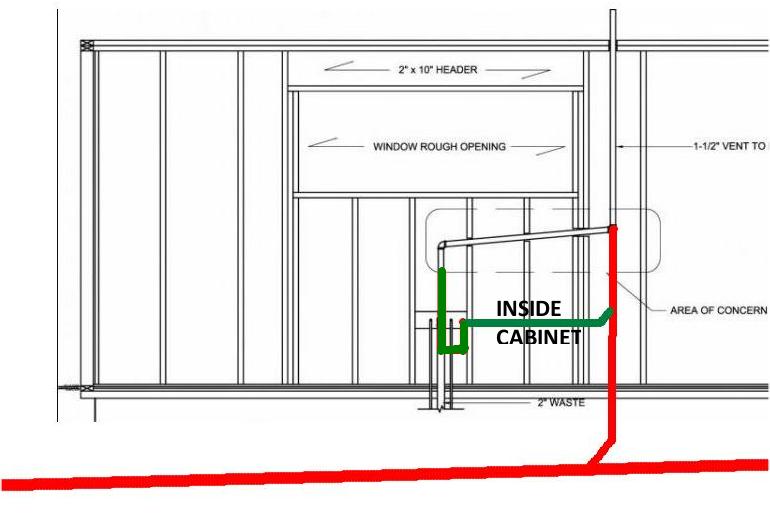
My experience and practical tips
I’ve installed vents under windows in several remodels. One job had a tight cabinet and a double sink. I used an AAV after confirming local approval. It worked well and avoided cutting into the brick exterior. The lesson: plan access and check codes first.
Tips from the field:
- Measure twice, cut once. Window headers are easy to damage.
- Bring sample vent caps when talking to inspectors—helps avoid back-and-forth.
- If uncertain, hire a licensed plumber. A small fee now often saves big repair costs later.
I’ve learned that good planning and modest extra expense upfront avoid messy callbacks.

Frequently Asked Questions of how to vent a kitchen sink under a window
Can I run a vent through the wall right under the window?
Yes, you can, but the vent must exit at a safe distance above the flood rim and must not allow sewer gas into the house through the window. Seal and flash the exterior penetration to prevent leaks.
Is an air admittance valve acceptable for a sink under a window?
Many jurisdictions permit AAVs for under-window sinks, but rules vary. Always confirm local code or inspector approval before installing an AAV.
How far can the trap arm run before it needs a vent?
Trap arm limit depends on pipe diameter and slope; typically a 1-1/2" trap arm has a shorter max length than a 2" line. Check your local code for exact limits to avoid siphoning the trap.
Will venting through the window header damage the structure?
Cutting into the window header can weaken the structure if not done correctly. Avoid framing members and consult a carpenter or structural guidance if you must alter framing.
What if my sink still gurgles after venting?
Gurgling may mean the vent is blocked, too flat, or the AAV failed. Inspect vent lines, clean blockages, and test the AAV; call a plumber if the issue persists.
Conclusion
Venting a kitchen sink under a window is doable with planning, the right method, and adherence to code. Decide between a sidewall vent, AAV, or rerouting to the stack based on access, cost, and local rules. Start with careful measurements, verify code allowances, and test the system after installation. Take action now: review your layout, check local plumbing rules, and either plan the DIY steps or contact a licensed plumber to get it done right. Leave a comment with your layout questions or subscribe for more practical plumbing guides.